

Just leased a new LE AWD. Stock sound is pretty bad as Im sure most here know if they have one.
I wanted to use the stuff I already had, but after testing the stock electrical, there's no way that was going to happen. Not without some major electrical upgrades that I wouldn't do to a lease. All stock at idle, voltage is 13.73V. With radio on normal volume, AC and brights on, it drops to 13.30V which is a large drop for stock. Wouldn't feel comfortable running much power at all through it.
So I just stuck to a low budget, stock look setup for now. Total price with tools and installation parts so far is $350.
Amp and Speakers
Alpine type S 6.5 components and coaxs, $140
Amazon.com : Package: Pair Alpine Sps-610c 6.5" 2 Way Pair of Component Car Speakers + Alpine Sps-610 6.5" 2 Way Pair of Coaxial Car Speakers : Component Vehicle Speaker Systems : Car Electronics
Alpine "power pack" mini 45x4 amp $125
Amazon.com : Alpine KTP-445U 4-channel Power Pack Amplifier : Vehicle Multi Channel Amplifiers : Car Electronics
Tools and installation
Trim panel tools $16
Amazon.com: 5Pc Auto Trim Door Panel Window Molding Upholstery Clip Removal Tool Kit: Automotive
Speaker baffles $26 (all four)
Amazon.com : Toyota Aftermarket 6.5-Inch Plastic Speaker Adapter (Black) : Vehicle Audio Auxiliary Adapters : Car Electronics
Speaker connectors $11 (all four)
Amazon.com: Metra 72-8104 Speaker Connector for Select Toyota Vehicles: Electronics
5mm drill bit $3
YG-1 High Speed Steel Gold-P Jobber Drill Bit, TiN Finish, Straight Shank, Slow Spiral, 135 Degree, 5.0mm Diameter x 86mm Length (Pack of 1): Amazon.com: Industrial & Scientific
Contractor grade riveter $22
Amazon.com: Stanley MR100CG Contractor Grade Riveter: Home Improvement
4mm rivets $8
Amazon.com: Stanley Paa58-5B Aluminum Rivets, 5/32 Inch X 1/2 Inch, Pack of 50: Home Improvement
Could save a few bucks if you have tools already or want to switch from rivets to screws/bolts. Also Kenwood has a mini amp that is similar for a bit less, but doesn't bridge channels like the Alpine.
Ive heard the Alpine speakers and the Kenwood KFC-P709Ps components, and the Alpine is a bit more clear, while the Kenwoods had more mid bass. I plan to add a sub soon, so I went with the Alpines. If you aren't adding a sub, or if you want to save a few bucks on the Kenwood amp and speakers, you cant go wrong either way for this price bracket.
Should have the stuff early next week. Will take some pics during the install. Hoping there is enough room behind the head unit to fit the mini amp. When done, going to retest the electrical and make a judgment call on how much more power I think it will take for a sub, which will determine the rest of what is going in it.
Update for install.
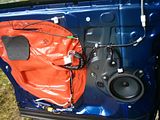
Got the speakers in so far. Ended up taking a few hours longer then I thought since the rivets didn't work out. Had to run and get some screws at some point. Here are some install pics.
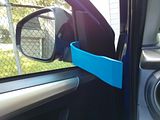
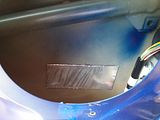
First step for the doors, pry off this piece.
Then pry here, and here.
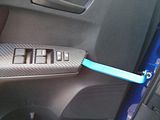
Use a nail to pull this piece back a little to slide the tool in and pull straight back. Then work your way down.

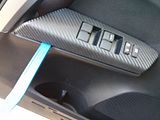
For this piece, pry over the lock.
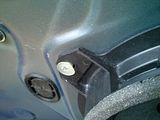
Remove the screw by the handle, and the two big screws in the deep holes behind where the silver trim was.
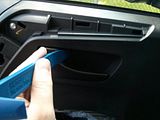
Then start prying the 9 clips around the edge of the door panel (8 clips for rear) and pull up. Unclip the door handle and lock levers.
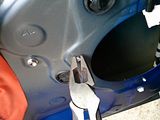
Once you drill off the rivet top, you see the rivets are imbedded in a rubber piece which makes it a pain to remove. Just keep drilling.
Chances are this will happen a couple times,
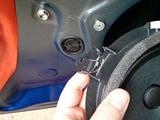
Use something strong to try and pull out the rest of the rivet, or to smash/cut off this part so you can push it through the hole.
I had some CLD tiles left from a previous car, so went ahead and put a few strips in the door. 25% coverage is more then enough. A few strips here and there is all that's needed. Couple this with MLV and CCF behind the door panel for a great sound deadened door. Here is a link to learn more and order.
http://www.sounddeadenershowdown.com/
Padded the mounts with CCF.
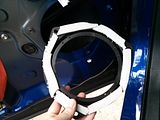
Screwed in.

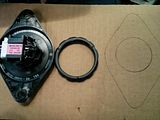
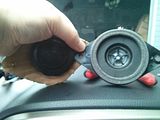
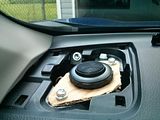
Pry the tweeter cover straight up. 10mm bolts hold it in. Pull it and disconnect it.
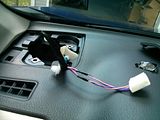
Connect the two same color wires together and put a butt on them.
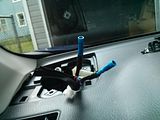
I make tweeter mounts out of cardboard. Very easy, cheap and flexible.
Back doors are the same as the front, just one less clip, and no plastic piece by the window to pry.
There is a bit more noticeable volume even without an amp. Sound is much improved, and mid bass is more improved then I expected. Still probably going to add a sub at some point. But at least so far, with volume around 40, it can be heard fine with the windows down at 75mph.
Updated, installed Alpine KTP-445U Power Pack Amp.
Got the KTP-445U in. Actually very surprised how well it works for the size and rating. Ive ran 100rms to much better components then these with fully deadened doors before, and while this setup obviously isn't as good, its still very good. Id say its closer to that setup then the stock setup in this. Enough midbass to rattle all the mirrors, enough volume for it to be pretty loud on the highway with the windows down, and pretty darn good sound quality as well. Will test the voltage hit tomorrow, but doubting it will be much.
For install go to post #23. Cant link enough photos to this post.
I wanted to use the stuff I already had, but after testing the stock electrical, there's no way that was going to happen. Not without some major electrical upgrades that I wouldn't do to a lease. All stock at idle, voltage is 13.73V. With radio on normal volume, AC and brights on, it drops to 13.30V which is a large drop for stock. Wouldn't feel comfortable running much power at all through it.
So I just stuck to a low budget, stock look setup for now. Total price with tools and installation parts so far is $350.
Amp and Speakers
Alpine type S 6.5 components and coaxs, $140
Amazon.com : Package: Pair Alpine Sps-610c 6.5" 2 Way Pair of Component Car Speakers + Alpine Sps-610 6.5" 2 Way Pair of Coaxial Car Speakers : Component Vehicle Speaker Systems : Car Electronics
Alpine "power pack" mini 45x4 amp $125
Amazon.com : Alpine KTP-445U 4-channel Power Pack Amplifier : Vehicle Multi Channel Amplifiers : Car Electronics
Tools and installation
Trim panel tools $16
Amazon.com: 5Pc Auto Trim Door Panel Window Molding Upholstery Clip Removal Tool Kit: Automotive
Speaker baffles $26 (all four)
Amazon.com : Toyota Aftermarket 6.5-Inch Plastic Speaker Adapter (Black) : Vehicle Audio Auxiliary Adapters : Car Electronics
Speaker connectors $11 (all four)
Amazon.com: Metra 72-8104 Speaker Connector for Select Toyota Vehicles: Electronics
5mm drill bit $3
YG-1 High Speed Steel Gold-P Jobber Drill Bit, TiN Finish, Straight Shank, Slow Spiral, 135 Degree, 5.0mm Diameter x 86mm Length (Pack of 1): Amazon.com: Industrial & Scientific
Contractor grade riveter $22
Amazon.com: Stanley MR100CG Contractor Grade Riveter: Home Improvement
4mm rivets $8
Amazon.com: Stanley Paa58-5B Aluminum Rivets, 5/32 Inch X 1/2 Inch, Pack of 50: Home Improvement
Could save a few bucks if you have tools already or want to switch from rivets to screws/bolts. Also Kenwood has a mini amp that is similar for a bit less, but doesn't bridge channels like the Alpine.
Ive heard the Alpine speakers and the Kenwood KFC-P709Ps components, and the Alpine is a bit more clear, while the Kenwoods had more mid bass. I plan to add a sub soon, so I went with the Alpines. If you aren't adding a sub, or if you want to save a few bucks on the Kenwood amp and speakers, you cant go wrong either way for this price bracket.
Should have the stuff early next week. Will take some pics during the install. Hoping there is enough room behind the head unit to fit the mini amp. When done, going to retest the electrical and make a judgment call on how much more power I think it will take for a sub, which will determine the rest of what is going in it.
Update for install.
Got the speakers in so far. Ended up taking a few hours longer then I thought since the rivets didn't work out. Had to run and get some screws at some point. Here are some install pics.
First step for the doors, pry off this piece.

Then pry here, and here.


Use a nail to pull this piece back a little to slide the tool in and pull straight back. Then work your way down.

For this piece, pry over the lock.

Remove the screw by the handle, and the two big screws in the deep holes behind where the silver trim was.
Then start prying the 9 clips around the edge of the door panel (8 clips for rear) and pull up. Unclip the door handle and lock levers.

Once you drill off the rivet top, you see the rivets are imbedded in a rubber piece which makes it a pain to remove. Just keep drilling.

Chances are this will happen a couple times,

Use something strong to try and pull out the rest of the rivet, or to smash/cut off this part so you can push it through the hole.

I had some CLD tiles left from a previous car, so went ahead and put a few strips in the door. 25% coverage is more then enough. A few strips here and there is all that's needed. Couple this with MLV and CCF behind the door panel for a great sound deadened door. Here is a link to learn more and order.
http://www.sounddeadenershowdown.com/

Padded the mounts with CCF.

Screwed in.

Pry the tweeter cover straight up. 10mm bolts hold it in. Pull it and disconnect it.

Connect the two same color wires together and put a butt on them.

I make tweeter mounts out of cardboard. Very easy, cheap and flexible.


Back doors are the same as the front, just one less clip, and no plastic piece by the window to pry.
There is a bit more noticeable volume even without an amp. Sound is much improved, and mid bass is more improved then I expected. Still probably going to add a sub at some point. But at least so far, with volume around 40, it can be heard fine with the windows down at 75mph.
Updated, installed Alpine KTP-445U Power Pack Amp.
Got the KTP-445U in. Actually very surprised how well it works for the size and rating. Ive ran 100rms to much better components then these with fully deadened doors before, and while this setup obviously isn't as good, its still very good. Id say its closer to that setup then the stock setup in this. Enough midbass to rattle all the mirrors, enough volume for it to be pretty loud on the highway with the windows down, and pretty darn good sound quality as well. Will test the voltage hit tomorrow, but doubting it will be much.
For install go to post #23. Cant link enough photos to this post.
")


