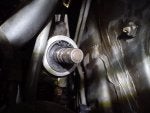
Toyota RAV4 Forums banner
21 - 40 of 61 Posts
Steering knuckle is rusted.
Spray it with some lube, work it back and forth.

This has happened to me with my rav and an older celica.
The best solution (which sounds crazy) was to pour some brake fluid on the knuckle.
It soaks in and eats the rust, a day later the steering is light and perfect.
This one [FONT=&quot]- part# 45260-42050 steering knuckle on the "Intermediate Shaft" ? [/FONT]
 
Steering knuckle is rusted.
Spray it with some lube, work it back and forth.

This has happened to me with my rav and an older celica.
The best solution (which sounds crazy) was to pour some brake fluid on the knuckle.
It soaks in and eats the rust, a day later the steering is light and perfect.
I sprayed “Steering knuckle” with WD40 - and my steering is fine now for almost a month even when temp drops below 32F. You was right about Steering knuckle - its rusted.. Thanks for your help!!!

I feel soo much better now, that I dont have to replace "Steering Rack" :smile
 
i will be getting a new rack eventually since the quick repair of the seal of the input shaft arent a lon term fix, for now i have flushed old the power steering out replacing it with fresh one adding some ATP AT-205 Re-Seal Stops Leaks and so far no leaks at all besides you can feel your steering smoother with fresh fluid, learned that one of the reasons why seals go bad is because we never replace the fluid
 
Well my original rack is still going strong at 234k, it's been used an abused by me, submerged in water on job sites, driven through mud puddles in the mountains and injected with Lucus stop leak. Seems like a big job to replace a perfectly good rack if only the deal is gone. If you do replace the rack id suggest doing th clutch at the same time as everything will be almost out anyway (if it's a manual).
 
Finally got around to fixing this. Took about 3-4 hours. Went pretty smoothly. So far looking like the leak is gone. Cost me less than $20 for the parts and had to buy some snap ring pliers for $10. Hardest part was getting the old seal out. Drilling through the hard plastic in a tight space was difficult, and I was concerned I would drill too deep, especially with the amount of force I had to press down to get the hole started. Once the old seal was out putting the new one in was a bit difficult as well. Not much room to swing a hammer. If I had to do it again I could probably get it all done in less than 2 hours.

Thanks again to everyone who posted here! :D
 
Does anyone know if this same process will work on my 2003 Gen 2 Rav? I can't get any answers on the Gen 2 forum and it looks like the intermediate shaft may be different.

Thanks,

George
 
Preparing myself and my rav4.1 for the same seal replacement.

Here are the part numbers and dimensions
Toyota: 90311-19007
Corteco: 19026513b
Nok: bp2152e
Dimensions: 19x38x7/7.8
Price in europe: 4$ for one seal

I will place some pictures how to replace it :)
 
I couldn't get the steering shaft to slid up off the steering rack input shaft.
Right now Im in process of replacing o-ring.
I couldn't get the steering shaft to slid up off the steering rack input shaft.
Do I have to detach the steering wheel to get access to the input shaft?

UPDATE: I got it - no need to remove steerng wheel
 
Alright I've completed it, BP2152E is correct and current. My local store could get it for 7 or 8 dollars but they said there would be a freight charge blah blah blah. Went to the dealer and paid 11 for it and 11 for the dust cover and was there the next day. Toyotal Seal part number is 90311-19007, dust cover number is 45222-42010. The above description on procedures is correct, I'll add some tricks and tools I used...

The hardest part of this job was removing and installing the splined steering column shaft from the power steering rack. I used a mid-length craftsman prybar and a hammer to spread the shaft's collar from above, using the wedge shape of prybar tip to spread the collar, being very careful to make sure the tip didn't damage anything. With the prybar wedged in collar you can carefully pull up on the prybar while grabbing the collar with your hand and the collar and shaft will pull off to rack.

Now remove the snap ring with snap ring pliers and the old oil seal (mine was very old and brittle, a small flat blade screwdriver on the inside of the ring worked well)

Install new oil seal using some Dexron to grease it up. I put the old seal on the new seal and used a 19mm deep 3/8 craftsman socket to drive the seal in with a small hammer. This didn't seat the seal all the way down, so i removed the socket and used seal and put a cleaned old axle nut directly on the new seal and hit the axle nut with screwdriver and hammer. This did the trick. Then put the snap ring back in and the dust cover on top of that.

This would also be a good time to do the fuel filter as well since it is very exposed.

Good luck to any future DIYers
old post but i noticed you are in OC haha and well I have this problem with my rav4 and was thinking of doing it one of these days. do you still have your rav? I just picked up a 98 3dr manual awd working out a few bugs with it but slow and steady haha.
 
Right now Im in process of replacing o-ring.
I couldn't get the steering shaft to slid up off the steering rack input shaft.
Do I have to detach the steering wheel to get access to the input shaft?

UPDATE: I got it - no need to remove steerng wheel
Here is a DIY with pictures and detail that I created based on the excellent info given by the OP and others in this thread. It should help others who are planning this job to complete it more quickly.

http://www.rav4world.com/forums/94-...replace-power-steering-rack-seal-pinion-valve-seal-stop-common-4-1-ps-leak.html

Good luck! I think this is a job that most anyone can do, but it helps to have smaller hands due to the space constrictions.

You did a very good DIY guide! Thanks.

Took me 2.5hours.
 
You did a very good DIY guide! Thanks.

Took me 2.5hours.
Thanks -- removing the seal was the hardest part for me! Did you discover any tips on how to remove it? Were you able to use the "screw" method, or something else?

I tried the screw method, but obviously did it incorrectly because it didn't work, and so it took me over an hour to get that dang seal out. Most of the time was spent searching through my tools for something I could slip under it without damaging the bearings that are behind it.
 
Thanks -- removing the seal was the hardest part for me! Did you discover any tips on how to remove it? Were you able to use the "screw" method, or something else?
Not who you're quoting, but thanks for the write up you did - it saved me a lot of time.

I didn't time myself but it went pretty quickly since the intermediate shaft just slid right off with minimal effort. I tried the screw method, but couldn't get a drill in there and couldn't get enough downward force with a screwdriver to pierce the seal. I whacked it with a punch a few times and aimlessly poked it with a seal puller (too long) but finally had success wedging a small flathead between the pinion shaft and seal then prying toward the right side of the vehicle.

So far so good, I'll keep checking my fluid levels for a while, but I think this got it.
 
21 - 40 of 61 Posts