

I went underneath our ’06 RAV4 to fix a buzzing sound, which turned out to be a heat shield that was touching that exhaust.
![]()
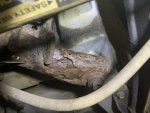
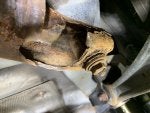
As I was looking at the rear subframe, I found this:
![]()
![]()
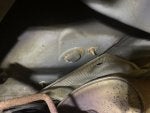
Which turned into this once I poked around with my bare hands.
![]()
![]()
![]()
I took the car off the road in August of 2021, save for a few trips in-town. I parked it in our garage in December of 2021, and just finished the project on 5/20/22. Don’t be discouraged by that timeline, I had a lot of time off in between working on other projects!
In our case, the Rav4 was probably worth around $4-5k at the time I discovered the rust. We’ve owned it since new, and it had turned 216k. It’s our third car, and I use it for dump runs, airport trips, hauling kayaks, hauling our small utility trailer to the dump, it. I love the smaller size, but with tons of room inside. Our two oldest are rapidly approaching driving age, and our intention was to add a backup camera to the Rav4 and have them learn to drive on it.
The rear subframe being bad would have mechanically totaled the car. New subframes at the dealer list at about $1.5k, and I can’t imagine the labor bill to take everything apart and put it back together. I tried to replace as few parts of possible, but there was a good amount of "while I'm in there" for sure.
Here's a list of what I replaced and why, it came to just under $1k total:
I started hunting for a subframe locally, and put in a request at a local yard. I never heard back from them. I checked on car-part.com, and a yard about a half hour away claimed to have a few. I asked them to pull the one that was in the best shape for me. The first one they pulled, like mine, was too far gone, but the second had some surface rust, but was solid.
My first step was to clean the subframe and prep it for paint. I hosed it down with soapy water, rinsed, and started to attack the flaky rust that was on the surface. What ended up working the best was a simple hammer, and especially the claw end. I dislodged most of the surface rust, and used some 80 grit sandpaper to smooth it all out.
Then I washed the whole thing down and followed Corroseal’s prep instructions, including using their cleaner. Then I put a few coats of Corroseal on, and a few coats of a Rustoleum topcoat. Time will tell, but I hope it will hold up well for many years.
This project was probably the most committed I’ve ever been into a project. The part that concerned me the most was the subframe itself, and in particular, the four mounting bolts. The front two bolts pass through a sleeve, so what I did was I drilled a small hole in the sleeve, and sprayed a ton of Sea Foam Deep Creep in there. I did the same with the two rear nuts that hold the subframe to the body.
Then I started taking stuff apart.
I put the car up on jack stands, I used Esco’s 10498 3 ton jack stands, which worked really well. I knew I’d be under the car for a while, so I figured they were worth the investment over the (non-recalled) Harbor Freight 6-ton jack stands that I’ve had for years. The Esco’s have a solid pin as a stop, and they were perfect. I put them at a height of __ inches.
I started with removing the 13/16” lug nuts, and then the wheels. The rear brakes came next, I removed the 14mm caliper bolts, and the 17mm caliper bracket bolts. I hung the rear calipers by a bracket in the rear of the car, and removed the 10mm bolt from the rear ABS sensors, and tucked them out of the way.
I went under the car and removed the last portion of the exhaust. Lisle 38350 exhaust hanger removal pliers were worth their weight in gold!
At that point, I put a smaller jack under the rear lower control arm, removed the 17mm outer bolts, and slowly lowered the jack. I pulled the rear springs, and all the insulators (which were in surprisingly good shape). One of the rear springs had broken about 1” from the top a few years ago (I found a piece in the garage one day), so I had planned to replace them with Moog 3rd row springs which I had bought on Rock Auto about a year ago, but hadn’t gotten to putting them back on.
I was able to remove the nuts on the inner rear lower control arm bolts, but the bolts themselves were fused to the bushings, so I left them. I disconnected the shocks (both 17mm bolts/nuts) and removed them. Somewhere around this point I undid the stake in the axle nut using this tool, and removed the axle nuts.
Then I started removing the various parts of the multi-link rear suspension (all 17mm), and I saved the 22mm rear trailing arm bolts for last. I grabbed the rear hub assembly, and put it to the side at this point.
At this point I drained the rear differential fluid. I used my HF 6 ton jackstand to prop up the rear axle shaft, and after a bunch of prying with no success, I used __’s tip to use a short chisel to remove the rear axle shafts, and that worked well. I put a baggie over the ends of the axle shafts that go in the differential to keep them clean, and wrapped electrical tape around the bad to keep them on. I did mark the axle shafts prior to removal so I would know which side they came from.
Then came the fun part – the rear driveshaft/differential. After marking everything with matchmarks, I loosened the 12mm bolts on the rear differential without difficulty, supported the driveshaft, and removed the center carrier bolts, as well. I was careful to keep the driveshaft aligned and not at too extreme of an angle.
Unfortunately, the driveshaft seemed to be pretty content to stay stuck to the electromagnetic coupler for another 16 years. No amount of Seafoam Deep Creep, gentle tapping, etc was effective. Finally, I used a smaller screwdriver and hammered it into the voids on the coupler, and the driveshaft finally separated from the coupler. I moved the driveshaft to the side and tackled removing the rear differential. I added some comments to the thread here: Changing Rear Differential Axle Seals/Removing Rear...
The biggest thing with the rear differential is making sure to remove the electrical connector and the vacuum line before you start! And the back mounting bolt is a pain, but I gave a pretty cheap solution that worked well for me.
With the rear differential removed, the subframe was next. I positioned my HF 6 ton jackstands strategically, took a deep breath, and started to loosen the nuts/bolts with my impact. They actually came out very easily, and then it was a matter of dropping the subframe a little bit at a time until I could put it on a mover’s dolly and roll it out.
A helper would make things easier, but it honestly wasn’t too bad with the for 6 ton HF jackstands.
I also replaced the parking brake cables, rear backing plates (mine were very rusted) and the rear hubs/wheel bearings as part of this, but I’ll skip over those steps for now. At this point, assembly is the reverse of removal. I couldn’t find a torque spec for the subframe bolts, so I started a discussion here. I went with 107 ft-lbs, which seemed like a reasonable amount, and was close to the specs for the bolt (102 ft-lbs), and a similar bolt in the front subframe. One of the rear bolts seemed to loosen as I lowered the subframe, so I torqued the two rear mounting bolts to ensure they were tight to the body before I installed the nuts that hold the rear subframe in.
Driveshaft bolts (12mm, 26ft-lbs)
Driveshaft center hanger bolts (14mm, 27 ft-lbs)
Drive the drive axle back in differential (open of clip facing downwards) using a blunt chisel
Insert axle
Fill rear differential with oil - ~0.5 qts 80W90
Support axle with jack stand
Connect rear trailing arm to knuckle/hub (22mm)
Support rear hub assembly with jack stand
Connect rear upper control arm (17mm)
Torque Rear trailing arm bolts to 148
Backing plate nut to tight - 22mm nut
Torque Rear wheel hub/bearing bolts to 68 ft-lbs - 14mm (use 3/8")
Lower fixed toe arm (recall) torque to 66 (17mm)
Reinstall abs sensor - 10mm
Shock bolts (17mm) to 59
Inner LCA bolt (17mm) to 66
Install upper and lower spring isolators
Install rear springs
Outer lca bolt (17mm) to 66 (w/weight on the suspension)
Put vehicle on ramps
Re-torque outer lower lca bolt
Torque sway bar bolts (55 to bar, 22 to Rear LCA) Mine were the Moog model end-links, so I’m not sure my sizes are the same as OEM.
Install Axle nut - 30mm
Torque parking brake line to backing plate – 22mm nut, unknown torque spec
Parking brake springs/shoes/etc
Adjust parking brake
Brake caliper bracket - 65 ft-lbs
Brake caliper bolts - 20 ft-lbs
Connect exhaust -
Torque Axle nut to 159 lb-ft
Install wheels, lug nuts to 76 ft-lbs
Pump brakes before putting into Drive
I'll be cleaning this thread up, adding pictures, etc. But I wanted to get a brain dump out there.
Wanted to give a huge Thank You to Dr. Dyno, who had gone through this a few years prior and gave me his advice based on when he had done it. And ask any questions you may have!
Edit 5/28/2023:
GET AN ALIGNMENT AFTER REPLACING THE REAR SUBFRAME. This will require getting new rear toe arms that are adjustable if yours were Epoxied as part of the recall.
Edit 3/9/2025: Link to Photo Dump from this project: https://www.rav4world.com/media/albums/rav4-rear-subframe-replacement.9070/

As I was looking at the rear subframe, I found this:

Which turned into this once I poked around with my bare hands.


I took the car off the road in August of 2021, save for a few trips in-town. I parked it in our garage in December of 2021, and just finished the project on 5/20/22. Don’t be discouraged by that timeline, I had a lot of time off in between working on other projects!
In our case, the Rav4 was probably worth around $4-5k at the time I discovered the rust. We’ve owned it since new, and it had turned 216k. It’s our third car, and I use it for dump runs, airport trips, hauling kayaks, hauling our small utility trailer to the dump, it. I love the smaller size, but with tons of room inside. Our two oldest are rapidly approaching driving age, and our intention was to add a backup camera to the Rav4 and have them learn to drive on it.
The rear subframe being bad would have mechanically totaled the car. New subframes at the dealer list at about $1.5k, and I can’t imagine the labor bill to take everything apart and put it back together. I tried to replace as few parts of possible, but there was a good amount of "while I'm in there" for sure.
Here's a list of what I replaced and why, it came to just under $1k total:
- Parking brake cables - old ones had broken due to corrosion - RAYBESTOS BC96648, BC96648 - $34.79
- OEM backing plates - old ones rusted away - 4650442040, 4650342040 - $279.46
- Timken rear hubs and bearings - TIMKEN HA590201 (qty. 2, $100 each) - HA590201 - $267.98
- Rear springs - Moog, 3rd row - MOOG 81747 - $64.07 (with shipping)
- Rear lower control arms - ACDELCO 45P0142 and ACDELCO 45P0142 - $138.67
- Upper spring insulators (Qty. 2) - OEM Toyota - 4825742030 - $18.38
- Lower spring insulators - OEM Toyota - 4825842020 - $11.50
- Axle seals - OEM Toyota - 9031137004 - $18.36
- Rear differential breather - OEM Toyota - 9093003235 - $2.65
- 85w90 differential fluid
- Refurbished subframe - $140 @ Junkyard
- Axle Nuts - OEM Toyota - 9008017238 $14.36 (for two)
I started hunting for a subframe locally, and put in a request at a local yard. I never heard back from them. I checked on car-part.com, and a yard about a half hour away claimed to have a few. I asked them to pull the one that was in the best shape for me. The first one they pulled, like mine, was too far gone, but the second had some surface rust, but was solid.
My first step was to clean the subframe and prep it for paint. I hosed it down with soapy water, rinsed, and started to attack the flaky rust that was on the surface. What ended up working the best was a simple hammer, and especially the claw end. I dislodged most of the surface rust, and used some 80 grit sandpaper to smooth it all out.
Then I washed the whole thing down and followed Corroseal’s prep instructions, including using their cleaner. Then I put a few coats of Corroseal on, and a few coats of a Rustoleum topcoat. Time will tell, but I hope it will hold up well for many years.
This project was probably the most committed I’ve ever been into a project. The part that concerned me the most was the subframe itself, and in particular, the four mounting bolts. The front two bolts pass through a sleeve, so what I did was I drilled a small hole in the sleeve, and sprayed a ton of Sea Foam Deep Creep in there. I did the same with the two rear nuts that hold the subframe to the body.
Then I started taking stuff apart.
I put the car up on jack stands, I used Esco’s 10498 3 ton jack stands, which worked really well. I knew I’d be under the car for a while, so I figured they were worth the investment over the (non-recalled) Harbor Freight 6-ton jack stands that I’ve had for years. The Esco’s have a solid pin as a stop, and they were perfect. I put them at a height of __ inches.
I started with removing the 13/16” lug nuts, and then the wheels. The rear brakes came next, I removed the 14mm caliper bolts, and the 17mm caliper bracket bolts. I hung the rear calipers by a bracket in the rear of the car, and removed the 10mm bolt from the rear ABS sensors, and tucked them out of the way.
I went under the car and removed the last portion of the exhaust. Lisle 38350 exhaust hanger removal pliers were worth their weight in gold!
At that point, I put a smaller jack under the rear lower control arm, removed the 17mm outer bolts, and slowly lowered the jack. I pulled the rear springs, and all the insulators (which were in surprisingly good shape). One of the rear springs had broken about 1” from the top a few years ago (I found a piece in the garage one day), so I had planned to replace them with Moog 3rd row springs which I had bought on Rock Auto about a year ago, but hadn’t gotten to putting them back on.
I was able to remove the nuts on the inner rear lower control arm bolts, but the bolts themselves were fused to the bushings, so I left them. I disconnected the shocks (both 17mm bolts/nuts) and removed them. Somewhere around this point I undid the stake in the axle nut using this tool, and removed the axle nuts.
Then I started removing the various parts of the multi-link rear suspension (all 17mm), and I saved the 22mm rear trailing arm bolts for last. I grabbed the rear hub assembly, and put it to the side at this point.
At this point I drained the rear differential fluid. I used my HF 6 ton jackstand to prop up the rear axle shaft, and after a bunch of prying with no success, I used __’s tip to use a short chisel to remove the rear axle shafts, and that worked well. I put a baggie over the ends of the axle shafts that go in the differential to keep them clean, and wrapped electrical tape around the bad to keep them on. I did mark the axle shafts prior to removal so I would know which side they came from.
Then came the fun part – the rear driveshaft/differential. After marking everything with matchmarks, I loosened the 12mm bolts on the rear differential without difficulty, supported the driveshaft, and removed the center carrier bolts, as well. I was careful to keep the driveshaft aligned and not at too extreme of an angle.
Unfortunately, the driveshaft seemed to be pretty content to stay stuck to the electromagnetic coupler for another 16 years. No amount of Seafoam Deep Creep, gentle tapping, etc was effective. Finally, I used a smaller screwdriver and hammered it into the voids on the coupler, and the driveshaft finally separated from the coupler. I moved the driveshaft to the side and tackled removing the rear differential. I added some comments to the thread here: Changing Rear Differential Axle Seals/Removing Rear...
The biggest thing with the rear differential is making sure to remove the electrical connector and the vacuum line before you start! And the back mounting bolt is a pain, but I gave a pretty cheap solution that worked well for me.
With the rear differential removed, the subframe was next. I positioned my HF 6 ton jackstands strategically, took a deep breath, and started to loosen the nuts/bolts with my impact. They actually came out very easily, and then it was a matter of dropping the subframe a little bit at a time until I could put it on a mover’s dolly and roll it out.
A helper would make things easier, but it honestly wasn’t too bad with the for 6 ton HF jackstands.
I also replaced the parking brake cables, rear backing plates (mine were very rusted) and the rear hubs/wheel bearings as part of this, but I’ll skip over those steps for now. At this point, assembly is the reverse of removal. I couldn’t find a torque spec for the subframe bolts, so I started a discussion here. I went with 107 ft-lbs, which seemed like a reasonable amount, and was close to the specs for the bolt (102 ft-lbs), and a similar bolt in the front subframe. One of the rear bolts seemed to loosen as I lowered the subframe, so I torqued the two rear mounting bolts to ensure they were tight to the body before I installed the nuts that hold the rear subframe in.
Driveshaft bolts (12mm, 26ft-lbs)
Driveshaft center hanger bolts (14mm, 27 ft-lbs)
Drive the drive axle back in differential (open of clip facing downwards) using a blunt chisel
Insert axle
Fill rear differential with oil - ~0.5 qts 80W90
Support axle with jack stand
Connect rear trailing arm to knuckle/hub (22mm)
Support rear hub assembly with jack stand
Connect rear upper control arm (17mm)
Torque Rear trailing arm bolts to 148
Backing plate nut to tight - 22mm nut
Torque Rear wheel hub/bearing bolts to 68 ft-lbs - 14mm (use 3/8")
Lower fixed toe arm (recall) torque to 66 (17mm)
Reinstall abs sensor - 10mm
Shock bolts (17mm) to 59
Inner LCA bolt (17mm) to 66
Install upper and lower spring isolators
Install rear springs
Outer lca bolt (17mm) to 66 (w/weight on the suspension)
Put vehicle on ramps
Re-torque outer lower lca bolt
Torque sway bar bolts (55 to bar, 22 to Rear LCA) Mine were the Moog model end-links, so I’m not sure my sizes are the same as OEM.
Install Axle nut - 30mm
Torque parking brake line to backing plate – 22mm nut, unknown torque spec
Parking brake springs/shoes/etc
Adjust parking brake
Brake caliper bracket - 65 ft-lbs
Brake caliper bolts - 20 ft-lbs
Connect exhaust -
Torque Axle nut to 159 lb-ft
Install wheels, lug nuts to 76 ft-lbs
Pump brakes before putting into Drive
I'll be cleaning this thread up, adding pictures, etc. But I wanted to get a brain dump out there.
Wanted to give a huge Thank You to Dr. Dyno, who had gone through this a few years prior and gave me his advice based on when he had done it. And ask any questions you may have!
Edit 5/28/2023:
GET AN ALIGNMENT AFTER REPLACING THE REAR SUBFRAME. This will require getting new rear toe arms that are adjustable if yours were Epoxied as part of the recall.
Edit 3/9/2025: Link to Photo Dump from this project: https://www.rav4world.com/media/albums/rav4-rear-subframe-replacement.9070/
")


