

Hi all,
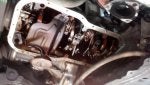
Noticed there weren't any step-by-steps on this forum for dropping the oil pan, so I thought I'd share my experience (with pictures attached). I have a 97 automatic. Overall, it was a very easy experience and only took about 2 hours.
Step 1: Remove the exhaust that runs from the catalytic converter to just past the chassis. It's about 2 or 3 feet long. This is possibly the most difficult part, depending on how old your exhaust is. I replaced this part about 2 years ago so my bolts came off pretty easily and only took about 10 minutes.
Step 2: Remove the structural piece in the front left corner (from the driver's perspective). This is so you can get to the oil pan bolts on the left side. There are three 14 mm (I think) bolts.
Step 3: Drain the oil. Remove all the bolts (10 mm) and carefully pry the oil pan off.
Step 4: Use a scraper and acetone or something to clean the old sealant off the flange and where it meets the housing. Make sure everything is nice and clean! Someone had replaced the sealant on mine with a cork gasket, which leaked like crazy. Go get the sealant from the Toyota dealership, I hear it works much better. It cost $18 USD.
Step 5: Put a 5mm wide bead of sealant around the flange, going on the inside of the bolts. On the left side of the flange (where there are no bolts), run the sealant about 5mm from the edge and on the inside of the little circles (you'll see them if you look).
Step 6: You've got about 5 minutes to get the pan on. I think my Chilton's said to tighten down the bolts to 48 inch pounds.
Step 7: Put the structural bracket and exhaust back on.
Step 8: Done! The sealant box said to wait 1 or 2 hours before starting the car.
After all this, however, the car still leaked. Actually worse than before.... I'm not sure what I did wrong. Any thoughts?? Any help would be appreciated! Even though I'm having problems, the process above is correct from what I've read. I probably shouldn't be putting out instructions if it didn't work for me, but I thought the pictures alone would be helpful to someone!


")


