Sun Visor Air Bag Label Removal -- Step by Step with Fotos
Label removal is strictly a personal preference.
I don’t wish to engage in the merits of safety labels or whether it’s a good idea to remove them or not.
If you want to discuss the dumbassity of removing these, or any other labels, take the high road and please start your own thread.
And if anybody has any tips or tricks that they found helpful or things they tried that went completely FUBAR
. . . . . please discuss. I'm always open to ideas and methods that worked or failed.
Hopefully this method, and these steps, which apply to vinyl covered visors, such as those found on many tieohtuh vehicles, helps you accomplish your objective without tearing up your visors.
Soooooo if you’ve decided to deLabel or you've considered it - - - -
First -- What Not To Do
Many threads on this subject suggest using hot-air-heat and/or acetone.
I don’t recommend either method for vinyl visors.
With Heat you run the risk of softening, stretching and distorting the vinyl covering as you pull the label up. Acetone, aka nail polish remover and lacquer thinner is a powerful smelly solvent that is overkill for your vinyl visors.
Plus, with Acetone, you stand the chance of weakening the vinyl as well as slightly (or majorly) changing the color of the vinyl. So, I don’t recommend either heat or acetone for this job.
Heat and/or acetone may be fine for other materials – for our vinyl visors, you risk damaging the vinyl and coming away disappointed and unhappy with the result.
Materials:
You will need: 91% Isopropyl Alcohol (Isopropanol) available at most pharmacies; An Old Wash Cloth that you will cut to size; A T25 Torx Bit and about two-ish hours of time for both visors.
Optional: – Tweezers, Eye Dropper or Oral Syringe, Plastic Wrap or Baker’s Parchment Paper.
Safety: Please consider wearing nitrile gloves as your hands and fingers are going to get pretty alchohalled up. Isopropyl alcohol, aka isopropanol, C3H8O, is a colorless, volatile and flammable liquid. The stuff you buy from the pharmacy is quite toxic and smelly. Work outdoors if possible or at least have some decent ventilation. In the fotos below I'm not wearing nitrile gloves, I suggest that you should wear them.
Note: you can prep both visors at the same time
Step by Step:
1 - Remove the two T25 torx screws that hold each visor – if you don’t own Torx bits or drivers, consider buying a set; they come in handy for all sorts of projects – automotive & otherwise.
2- This is the combination fitting/bracket/connector that holds the visor to the roof and also supplies 12V dc to the visor vanity mirror. After removing the two T25’s, pull down on the bracket. The entire visor and combo fitting will release as a single assembly.
PRO-TIP – do not attempt to remove the labels without first removing the visors from the vehicle. ;-)
3. Lay the visor on a flat surface and cut a wash cloth to fit over the label. The cloth should be slightly larger than the label. Wet the cloth with your 91% alcohol and pat it down over the label.
PRO TIP – Alcohol evaporates quickly; it leaves behind mostly distilled water. Once the cloth is nice and wet, wrap or cover it with either stretchy plastic wrap or parchment paper. This slows the evaporation process and helps concentrate the isopropanol directly over the label.
4. Give the soak about ten minutes and then wet down the cloth w/more isopropanol and cover again to slow evaporation. I let everything soak about thirty to forty minutes and periodically wet the cloth every ten or so minutes.
5. I used my fingernail to start a corner and then caught it with tweezers.
6. Once a thumb sized section pulled up, I wet a cloth with isopropanol and with one hand I grasped the corner and SLOWLY pulled the label up. With the other hand, I pushed down on the vinyl and ran the alcohol soaked cloth back and forth along the seam made where the label is pulling away from the vinyl. The idea is to wet the underside of the label, where the adhesive lives and emulsify it as you slowly pull the label away from the vinyl.
7. Another method is to fill the oral syringe, or an eye dropper, as a way to keep the vinyl to label seam wet as you slowly pull the label up. I used a combination of both methods, up & down cloth on the seam and syringe on the seam. Once the label started pulling away the syringe worked quite well.
That’s pretty much it.
A few randumb thoughts
You should be able to clean any residual glue off of the vinyl with your isopropanol soaked cloth. If you have any specks, an old toothbrush soaked in alcohol works well. If there is any stubborn residue spray some WD40 on a fresh cloth and go after it. Than go over the vinyl with a clean fresh cloth soaked with warm water and detergent to remove any remaining WD and get rid of that pungent WD smell.
Chances are you won’t have any residue and won’t need WD40. There are some commercial goo cleaner products on the market, however I have no experience using them. And they seem kinda expensive compared to what I keep in the shop (ie: 2oz Goo Gone about $5/$6 12 oz WD40 $5). Besides WD40 as a goo remover, I’ve had decent success using plain old vegetable or olive oil to remove glue residue.
If you use an oral syringe to dissolve the glue, be aware that alcohol and rubber are not friends. The oral syringe has a rubber tipped plunger. Prolonged exposure to alcohol can eventually destroy rubber. So when you are done with delabefication, DO NOT store the syringe filled with isopropanol. Squeeze out any remaining liquid, rinse the syringe well and wash it with warm water and detergent. I also would advise relegating said syringe to your tool box and not back to the medicine cabinet.
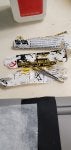
For some reason, the passenger side label came up a little easier. The driver side (at least on USA cars) has three labels; two on the visor front, and one on the back where the vanity mirror lives. Getting the labels started is the most difficult part; keep them wet as you proceed and make sure you keep the seam between the label and vinyl pretty saturated as you pull up on the label. As you can see from the attached foto at the bottom of the page, the labels, moral or less, came up rznably intact and not in sixty small pieces.
I did this on my car about two weeks after buying it so there wasn’t much discoloration between where the labels were and the rest of the visor.
Passenger Side
Driver Side Visor Back
Driver Side Visor Front
Good luck and have fun.