Toyota RAV4 Forums banner

7-pin trailer wiring harness, a simple writeup

59K views 77 replies 27 participants last post by  JDF RAVMAN  
#1 · (Edited)
Image


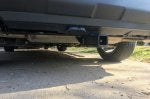
I finally put together a writeup for how I went about installing my 7-pin wiring harness with full brake controller functionality. I have a 2019 XLE AWD. The attached PDF is probably the best thing to look at, but I'm attaching all my photos I documented along the way. They should line up and work together:

PDF write-up:

Photo library:

I'm open to any criticism or any input anyone has. There weren't any solid documents on how to do this when I first started it all, so a lot of this was me figuring out / inferring things on my own. Some recent stuff has been coming out pertaining to the gen 5, so people have probably figured out some better ways to go about some portions of this (for example: just recently I saw a Russian video showing a prefab hole penetrating the firewall behind the battery, oops!). I eventually reached the finish line and I'm proud of myself for doing so.
Hopefully some of you can get some use out of this!-


Attachments

#6 ·
A few comments based on my installation of half a dozen brake controllers.

1. NEVER buy a "timed" controller. They are inexpensive BUT can't adjust braking force for speed or vehicle attitude (uphill, level or downhill). One of their supposed "advantages" is "mounts in any direction." I'm surprised they are even legal.

2. Use a proportional controller as shown in this install. There are many different one available. The choice may come down to where the adjustment controls are on the unit. For instance in this write-up the buttons are on top of the controller and thus hard to access after installation.

3. After using Tekonsha, admittedly older models, exclusively for years I've switched to the Curt Triflex 51140 after my 10+ year-old Tekonsha became virtually impossible to adjust correctly. When set right you can't even tell the trailer is attached when braking. I do have to say that my Curt did fail after a year but one call to them got a me a new one shipped Priority for free. I didn't get to take to old one apart tho because they also sent a return label for it.

4. Altho I've run the wiring underneath on a Honda Passport and on Pickups you have no other choice, I prefer the inside path behind the sill and side panels as I did on a RAV4. You may need a firewall penetration at the front and a floor one at the rear but otherwise all wiring is safely inside.

5. Installing the 4/7 pin connector fixture into the underside of the bumper is really slick.

6. Altho the 150A rating is a little overkill the breaker/switch unit is perfect for a non-use disconnect. Would've been handy when my BIL and our wives were towing a Scamp trailer in Alaska. To keep the 12V circuits in the trailer from possibly running down the RAV4's battery we had to remember to disconnect the 7-round cable each night.
 
#7 · (Edited)
Excellent, thanks Dr. Dyno!

4. Fully agree. If I did this over again I'd go that route, there's an easy wiring channel inside the interior plastic covers at the floor of the doors. Initially looked into running the cables through there but I wasn't sure how to get them through the firewall. But, a recent 4-pin tutorial details a prefab penetration behind the battery (@5:25 of this youtube video). Kind of kicking myself for not finding that, oh well.

6. Bingo, exactly my use with my camper. Also like having things off when I'm not using 'em. 150A is completely overkill and honestly redundant / not needed, was just after the switch on it! A non-breaker switch would work just as well, but I couldn't find a good one that fit the spot.
 
#8 ·
So, at the sake of losing most of my credibility, the brake signal was NOT the turquoise wire! Finally got a Curt 7-pin tester (was using a multimeter before) and things were behaving a bit strange. After a couple of hours troubleshooting, finally figured out that the turquoise wire only remains at high voltage for a few seconds after the brake pedal is pushed, then goes back down to a low voltage state even if it remains held down. Gah! I originally got help from uhaul finding this wire and they actually tapped it for me for free, so can't exactly hold them to fix it. I should have done better due diligence and thoroughly tested it after they tapped it. I just saw a higher voltage when braked and thought all was good.

I'm planning on picking up my Aliner camper this weekend, so this means I'll be spending the next few nights finding the correct brake pedal wire... I'll update the PDF when I fix it.
 
#9 · (Edited)
Found the wire! Went back to uhaul and after a bit they gave up on it, called the dealership and they didn't want to do it, so here we are. I tapped the RED/WHITE wire, inside the cable bundle under the plastic covers at the floor of the driver door.

This signal is feeding the left brake light (0v low +12v high). I was a little iffy poking around are the connector on top of the brake pedal (the place all other brake controllers are tapped at) due to it being really hard to access, thanks Toyota. Secondly, I wasn't fond of the idea of Toyota Safety Sense not controlling the trailer brakes during a pre-collision event or for dynamic cruise control. This solved those woes. Towing with it last weekend went very smoothly!


#11 ·
Well, I actually didn't wire anything for reverse. My camper is tiny, isn't even wired for it, so at the time I didn't really see a future need. I'll probably regret that one day...

Should be able to hunt down the wire color with a multimeter on the reverse bulb, @1:30:
 
#13 · (Edited)
Hmm... that's stretching my memory a bit. I remember looking through the entire bundle and I only found one red/white combo. I thought it was an even color split, but it may have been more white.

Are you certain the tap punched through the sleeving? I did have a little bit of trouble maintaining the connection with my first tap, I think due to the wire gauge being so thin. When I removed it, I noticed my tap barely got through it. I used some strippers to "pre-cut" the sleeve a little deeper on my second go.

EDIT: looking through some photos it does look more white with red stripe:
 
#15 ·
Yes, the wiring is the electrical part which has nothing to do with what mechanical hitch receiver, if any is mounted.
 
  • Like
Reactions: pjfhau
#17 ·
I ended up running a wire back to the taillight, because I knew how to find that wire. The wiring may have changed due to mine being a different trim, or it may have just been a production change.

I ran the brake sense wire within the cabin, which means pulling all the lower plastic trim and one rear seat on that side. If you look for videos on doing an OEM install, they go through all the steps (same channel as mentioned before).

I originally ran the power and brake wires underneath the cabin, but would have kept everything within the cabin if I did it again. Underneath is probably easier if you have a lift (like all the youtube install videos that I found), but routing around the AWD was a pain.

I ran wires from the engine compartment to the cabin through the nipples that were shown in the video mentioned earlier. However, they are fairly hard to get to, so I pulled the wipers for access. Removing the wiper arms was tricky because there is very little room around them to attach the puller. I used a straight arm style puller and managed to flex the shroud to get them into place. If I had found this post earlier, I might have tried the lower grommet route.

Everything seems to be working now. Thanks for the detailed write up!
 
#20 ·
Ah, yes, that's a phoenix connector (Euroblock) normally used in audio / low voltage control systems. I have a bunch laying around and it ended up working well, the wires screw into the terminal block and I slipped the diode into the female slots. Just got creative with what I had, without them I'd probably just crimp the wires to the diode pins.
 
#21 ·
Has anyone else had trouble finding the red and white brake light wire in the bundle under the driver's door trim? I tapped that wire, like outlined in the photos, and I don't think my trailer brakes are working. My tester shows the trailer brakes are on with it plugged in but the brake controller is not showing red. There are several red/white wires in that bundle but only one that is about 12 gauge, all the remaining ones are very small wires. I guess I can use a tester on the wire and hit the brake pedal but am concerned that if I hold the positive on the wire and the negative to a ground the electronics may not like it. Any help would be nice. Also, I ran the wires underneath and would just take the interior apart if I had it to do over. Underneath is hell. A final thought, getting the wires through that boot was a bear even with the battery out.
 
#23 ·
@mstaffor the red/white wire I tapped was not 12 gauge it was much smaller. Best way to figure out the right one is with a multimeter like you mentioned. 12V when the brake pedal is pushed.

A multimeter only takes what it needs from a circuit and will not damage anything, when used properly. Typically all power within any given system will try to find the easiest path back home to ground. A multimeter, when set to read voltage, has an impedance somewhere in the megaohms. That much resistance won't put a noticeable load on the circuit even with these tiny wires.
 
#24 ·
I finally got the correct wire tapped to the brake switch. It is indeed white with a red stripe and is located in the driver's side panel where shown. It is not the larger white with a red stripe wire. It is one of the smaller (say size 18-22) sized wires. Also, I used the Teksosha PN 7865 connector to my trailer brake connector as it has the diode you need already installed. This connector will mate directly to several Tekonsha, Draw-tite, Reese Towpower and Reese brake controllers.
I do have one question about the backup light connection. DanLnco replied that he made this connection and I was wondering if just hooking up to the backup light wire was sufficient or if a relay was required. If I can attach a photo to this reply you will see the small brake wire I tapped for the brake controller and to the left the larger wire I mistakenly tapped as it has gouge marks from the tap.
156386
 
#25 ·
Great addition, thanks for the info @mstaffor. It's great to see the wire in comparison to the bigger one you originally tapped. I think hooking straight up to the car's backup light wire will do just fine. I imagine a relay is useful if your reverse lights draw a lot of power, but for the trailer size we're limited to on our RAVs I can't imagine that being an issue. If it's too much it'll pop your reverse fuse and then you can look into adding a relay.
 
#26 ·
Question: I am having a tow hitch with 7-pin installed at U-Haul on my 2019 Adventure. I did not ask for trailer brake controller or wiring as I figured I'd wait until I buy the travel trailer. Since we're 90% sure we'll be getting the trailer, am I making a mistake in not having everything done at the same time? Thank you!
 
#28 ·
If it were me, I'd have them install the wiring for it and leave the 4 ends tied up under the console (and buy a controller later). It's a separate system but they'll be lifting it and pulling interior panels in the rear, so might as well have them do it all. May be worth it to ask what their cost difference is doing them separately vs together. When you find your trailer you won't be held up by this either. If you go that route ensure they fully test it with one of their controllers. My local U-Haul couldn't find the wire to tap after multiple attempts, so I'd ask them about that beforehand. Maybe print this writeup and give it to them for a reference :p
 
#27 ·
The electrical work of the harness/brake controller is completely independent of the mechanical work of the hitch receiver so I'd do them separately.
Also gives you time to choose the brake controller that's best for you. After installing & using several Tekonsha models my current favorite is the Curt TriFlex. But those are in my F250s. We used a different make (can't remember which one) in my BIL's Tundra because it fit perfectly in the space his dash had for it. Your choice may depend on what fits your RAV4 mounting options. I'm sure others will chime in as to their preference.
 
#31 ·
We had the dealer install the oem hitch and 4 pin wiring on our 2018 rav4 adventure. I was surprised how much the tech had to take apart - rear bumper, rear seats, and all the plastic panels in the trunk area. Plus he ran a wire(s) to the engine compartment/battery. We didnt know we would need the 7 pin until we just recently bought a used popup camper. With all that work done, do we really need to run a wire to the battery again? Thanks for your help.
 
#32 ·
Yes, you will need additional runs. The battery>7pin wire is used to charge your camper's battery while in tow. It ensures your trailer's battery is sufficiently charged so your breakaway system will have enough power to hold the brakes and stop the trailer if disconnected. I think it's even a law in some states. Also just nice to have a full battery in the PUP when you get to site.
You'll need to run a wire from battery>driver and another one from driver>7pin as well.
 
#33 ·
The three extra pins that a 7-round connector has in addition to the 4-flat ones are for backup lights, live power as CodaMo says and electric brakes.
The backup light connection if you want it can be connected in the rear of the vehicle at the lights themselves.
The wire that was installed up to the battery was probably for a taillight converter but if it's large enough (12AWG) it could also be used for live power.
The additional wire that may have to be run is for the brake controller and to do it properly it should be routed behind the same panels except it goes to a dash mounted brake controller not the battery. However the controller will also need live power but that could be supplied by splicing into the other wire already run to the battery.
If you got real lucky and the installer had some foresight he may already have run the second wire for the brakes while the car was all apart.
 
#39 ·
I had a company install the 7 pin on my 2020 Rav TRD. I do not believe they put a diode inline with the brake wire. So now when I hit the manual button on my Drawtite brake control it has disabled the pre-collision and it's displayed on my dashboard. I called the company and they said to take it to the dealer and flash the ECM is this going to fix the issue of not having a diode in place.
 
#40 ·
Is there a reason you should have to pay your dealer to fix their error. I think not!
 
#43 ·
Almost done. One quick question: Where could I tap to the backup light easier?
I'd assume it'd be easiest to access the reverse light wire in the same rear hatch compartment you stashed your controller. Should be able to trace the wire color via pulling the tail light off. Similar to the video referenced earlier: