Hi Everyone,
I intend to show you how to go about replacing your side mirror on your 4.4 Rav4.
Mine is a 2013, I'm doing it on the passenger side, and I'm using an OEM part. I would imagine the '14 and up to be the same process, I'm sure there are more connections behind the drivers side door, and there may be a some minor differences in a non-OEM part -- I'm not sure. Just beware there could be some discrepancies based on these variables.
Now is probably a good time to mention the disclaimer: Do the following at your own risk. If you PM me, I'd be glad to offer any advice I can -- but ultimately, you're responsible for the work done and the outcome.
With that out of the way, let's get started!
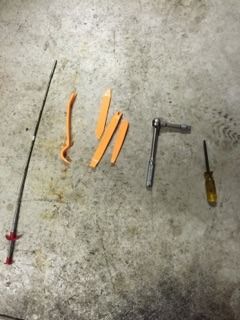
Tools Used:
-- Phillips Head Screwdriver
-- 10mm Socket Wrench (extension very helpful)
-- Trim Removal Tools
Here are the ones I used:
Amazon.com : Ostart 4pcs Auto Car Radio Door Clip Panel Trim Dash Audio Removal Installer Pry Tool : Automotive Upholstery Repair Tools : Car Electronics
-- Claw-Style Retrieving Tool (Optional, probably don't need)
![Image]()
Step 1
Using your Trim Removal tool, remove the "L-shaped" silver trim piece from the interior door-grab, starting at the top and working your way around. This should come off fairly easily. Set aside where it won't get stepped on or scratched.
![Image]()
![Image]()
Step 2
Using your Trim Removal Tool, remove the triangular plastic piece above the door panel, in the front corner of the window. This is a bit harder than the door-grab trim piece, but still should come off relatively easily.
![Image]()
Step 3
Using your Trim Removal Tool, wedge it between the door lock and the plate within the door handle and pry forward to remove. This will come out easily.
![Image]()
Step 4
Now that all of the trim pieces are removed, start to remove the screws holding the door panel in.
Using your Phillips screwdriver, remove the 4 screws found behind the "L-shaped" door grab. Set the screws aside, remembering or noting where they came from.
![Image]()
Step 5
Using your Phillips screwdriver, remove the screw behind the door handle trim piece.
This picture also shows the various Trim Removal Tools I used in removing the trim pieces. You can use whatever works best for you.
![Image]()
Step 6
Using your Trim Removal Tool, get between the door panel and the metal door and begin prying these apart. I started at the bottom corner and worked my way around counter-clockwise.
![Image]()
Step 7
Once the door panel is fully undone at the bottom and along the sides, carefully lift the top part out of the window channel. It may help to have something to place the door panel on as we won't be fully removing it from the door. Conveniently, the empty box from the new part sat just high enough to place the door panel on. I don't have a picture of that, but if you get the OEM part, you can probably just rest the door panel on the empty box like I did.
We're not fully removing the door panel because we don't have to for this job. We're only trying to get to the white wire harness for the mirror.
![Image]()
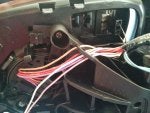
Step 8
Unclip the wire harness. I don't have a picture of the harness plugged in, but if you've made it this far, you should be able to figure out how to unclip a wire harness") Just push the little tab in and pull the harness out.
Just push the little tab in and pull the harness out.
![Image]()
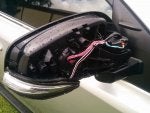
Step 9
Now it's time to start removing the actual mirror assembly itself. Besides the 3 obvious 10mm bolts holding it on, there is a small metal clip and it's also fastened to the door gasket with small "button" style fasteners. These fasteners STAY WITH THE RUBBER DOOR SEAL. They unclip from the mirror assembly itself. Here is a pic of the metal retaining clip and one of the two door seal "buttons"
Unclip these "buttons" first, then, using your 10mm socket wrench, begin removing the 3 bolts. Be VERY careful not to drop these into the door!! Tape your wrench to the bolt w/electrical tape if necessary. Also, this will separate the assembly from the door, so be sure you're supporting this as you remove the very last bolt. I removed the top one last. The metal retention clip will just come right out once everything else is removed.
![Image]()
A few more of the little door gasket "buttons". Remember, these unclip from the MIRROR assembly not the rubber gasket.
![Image]()
![Image]()
![Image]()
That's it for removal. Bolting the new one on should be pretty easy from here on out.
-- Feed the wire harness through the square cutout in the door.
-- Position the mirror as it should be
-- Bolt it on with the 3 bolts (CAREFUL TO NOT DROP THEM). I would recommend tightening them in unison - so do each one a little bit until they're all tight.
-- Plug the harness in
-- Button the door seal to the mirror with the "button" clips
-- TEST the turn signal and the motion of the mirror.
-- Put your door panel back on - sliding it into the window channel first
-- Replace screw behind door handle
-- Replace screws behind "L-shaped" door grab
-- Replace all trim pieces
A few MUST READ notes/tips:
1. When you are reinstalling the new mirror, Be VERY careful not to drop any of the bolts into the door. Tape them to your wrench if needed. I dropped one in during reinstall and it was a PAIN.
2. It appears the holes on the new mirror are smooth on the inside and made to accept the self-tapping bolts. So you are literally tapping the holes in the new mirror (OEM in my case). This makes it hard to tell when it's fully secure and also makes you feel like you're cross-threading badly. You're not, just be very careful.
3. The trim removal tools are probably not 100% necessary -- a flat-head screwdriver can do some of that stuff. But I will say, having done these types of things before... just buy the tools... They're $5 or $6 on Amazon and they work.
4. When reinstalling the bottom screw behind the "L-shaped" trim piece, be careful to not drop this into the small cutout slot in the door panel or you'll be taking the whole door panel off again. I ended up taping this to my screwdriver with electrical tape to ensure it wouldn't fall through. If you have a magnetic screwdriver, that may work too (couldn't find mine).
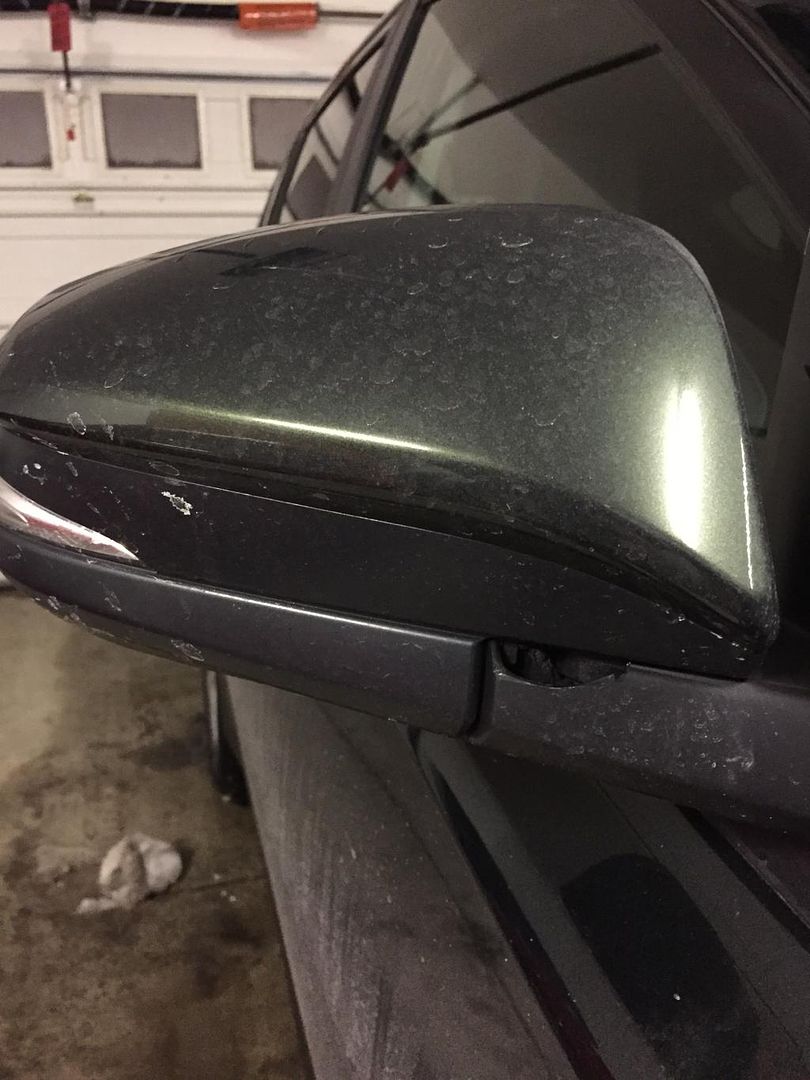
Before:
![Image]()
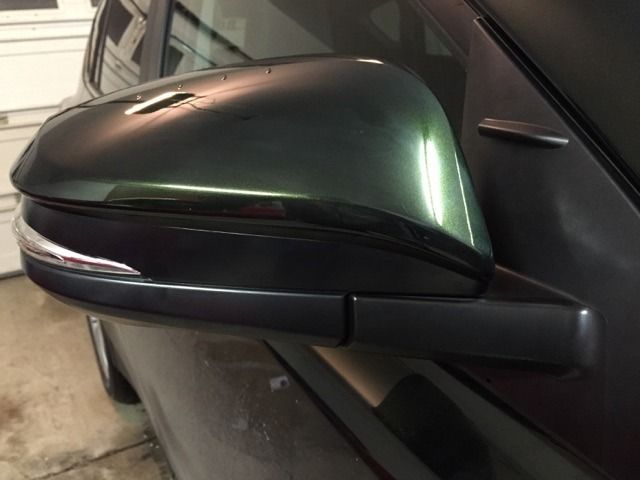
After:
![Image]()
For anyone interested, I purchased the OEM replacement here:
Toyota Online Parts | toyotaonlineparts.com
My dealer quoted me something like $385 for the part and $95 for labor to put it on ($480 + tax = $511.20)
I got the part above shipped to me for $270!
I intend to show you how to go about replacing your side mirror on your 4.4 Rav4.
Mine is a 2013, I'm doing it on the passenger side, and I'm using an OEM part. I would imagine the '14 and up to be the same process, I'm sure there are more connections behind the drivers side door, and there may be a some minor differences in a non-OEM part -- I'm not sure. Just beware there could be some discrepancies based on these variables.
Now is probably a good time to mention the disclaimer: Do the following at your own risk. If you PM me, I'd be glad to offer any advice I can -- but ultimately, you're responsible for the work done and the outcome.
With that out of the way, let's get started!
Tools Used:
-- Phillips Head Screwdriver
-- 10mm Socket Wrench (extension very helpful)
-- Trim Removal Tools
Here are the ones I used:
Amazon.com : Ostart 4pcs Auto Car Radio Door Clip Panel Trim Dash Audio Removal Installer Pry Tool : Automotive Upholstery Repair Tools : Car Electronics
-- Claw-Style Retrieving Tool (Optional, probably don't need)
Step 1
Using your Trim Removal tool, remove the "L-shaped" silver trim piece from the interior door-grab, starting at the top and working your way around. This should come off fairly easily. Set aside where it won't get stepped on or scratched.


Step 2
Using your Trim Removal Tool, remove the triangular plastic piece above the door panel, in the front corner of the window. This is a bit harder than the door-grab trim piece, but still should come off relatively easily.

Step 3
Using your Trim Removal Tool, wedge it between the door lock and the plate within the door handle and pry forward to remove. This will come out easily.

Step 4
Now that all of the trim pieces are removed, start to remove the screws holding the door panel in.
Using your Phillips screwdriver, remove the 4 screws found behind the "L-shaped" door grab. Set the screws aside, remembering or noting where they came from.

Step 5
Using your Phillips screwdriver, remove the screw behind the door handle trim piece.
This picture also shows the various Trim Removal Tools I used in removing the trim pieces. You can use whatever works best for you.

Step 6
Using your Trim Removal Tool, get between the door panel and the metal door and begin prying these apart. I started at the bottom corner and worked my way around counter-clockwise.

Step 7
Once the door panel is fully undone at the bottom and along the sides, carefully lift the top part out of the window channel. It may help to have something to place the door panel on as we won't be fully removing it from the door. Conveniently, the empty box from the new part sat just high enough to place the door panel on. I don't have a picture of that, but if you get the OEM part, you can probably just rest the door panel on the empty box like I did.
We're not fully removing the door panel because we don't have to for this job. We're only trying to get to the white wire harness for the mirror.

Step 8
Unclip the wire harness. I don't have a picture of the harness plugged in, but if you've made it this far, you should be able to figure out how to unclip a wire harness
Just push the little tab in and pull the harness out.
Step 9
Now it's time to start removing the actual mirror assembly itself. Besides the 3 obvious 10mm bolts holding it on, there is a small metal clip and it's also fastened to the door gasket with small "button" style fasteners. These fasteners STAY WITH THE RUBBER DOOR SEAL. They unclip from the mirror assembly itself. Here is a pic of the metal retaining clip and one of the two door seal "buttons"
Unclip these "buttons" first, then, using your 10mm socket wrench, begin removing the 3 bolts. Be VERY careful not to drop these into the door!! Tape your wrench to the bolt w/electrical tape if necessary. Also, this will separate the assembly from the door, so be sure you're supporting this as you remove the very last bolt. I removed the top one last. The metal retention clip will just come right out once everything else is removed.

A few more of the little door gasket "buttons". Remember, these unclip from the MIRROR assembly not the rubber gasket.


That's it for removal. Bolting the new one on should be pretty easy from here on out.
-- Feed the wire harness through the square cutout in the door.
-- Position the mirror as it should be
-- Bolt it on with the 3 bolts (CAREFUL TO NOT DROP THEM). I would recommend tightening them in unison - so do each one a little bit until they're all tight.
-- Plug the harness in
-- Button the door seal to the mirror with the "button" clips
-- TEST the turn signal and the motion of the mirror.
-- Put your door panel back on - sliding it into the window channel first
-- Replace screw behind door handle
-- Replace screws behind "L-shaped" door grab
-- Replace all trim pieces
A few MUST READ notes/tips:
1. When you are reinstalling the new mirror, Be VERY careful not to drop any of the bolts into the door. Tape them to your wrench if needed. I dropped one in during reinstall and it was a PAIN.
2. It appears the holes on the new mirror are smooth on the inside and made to accept the self-tapping bolts. So you are literally tapping the holes in the new mirror (OEM in my case). This makes it hard to tell when it's fully secure and also makes you feel like you're cross-threading badly. You're not, just be very careful.
3. The trim removal tools are probably not 100% necessary -- a flat-head screwdriver can do some of that stuff. But I will say, having done these types of things before... just buy the tools... They're $5 or $6 on Amazon and they work.
4. When reinstalling the bottom screw behind the "L-shaped" trim piece, be careful to not drop this into the small cutout slot in the door panel or you'll be taking the whole door panel off again. I ended up taping this to my screwdriver with electrical tape to ensure it wouldn't fall through. If you have a magnetic screwdriver, that may work too (couldn't find mine).
Before:
After:
For anyone interested, I purchased the OEM replacement here:
Toyota Online Parts | toyotaonlineparts.com
My dealer quoted me something like $385 for the part and $95 for labor to put it on ($480 + tax = $511.20)
I got the part above shipped to me for $270!