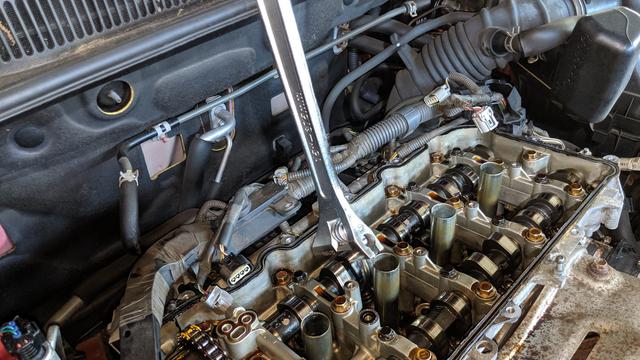
The only edit I'd make to your notes is in the removal of the timing chain tensioner.. "pry" wasn't descriptive enough.. I ended up having to use a pry bar and thought I was going to destroy it to get it off. I also found a trick of using a long flat blade to push the chain guides in, and then wedged it against the axle with a block of wood to hold it out of the way in order to re-install the tensioner. In the end, the job is done,
I realize this is an old post but I thought I'd bring something useful to the discussion. Keep in mind, I'm struggling with this same issue and after finding what appears to be a solution, have not gotten home to implement it. If it turns out I'm wrong on this, I'll delete this post. I have not been able to remove the tensioner after following the instructions as I understood them.
Regarding the tensioner, I've found another Youtube video that does a good job of showing what needs to be done for its removal.
1) After TDC and removal of the top chain guide, observe the timing chain guide and the tensioner ram (?) through the tensioner opening. By turning the crankshaft counterclockwise (ccw), the chain tightens up in front of the tensioner. This straightens the timing chain, which pushes the chain guide back and as a result, forces the tensioner ram (?) to retract. I'd say this is just a theory but the other video clearly shows it happening as I've described it.
2) Insert the wire (or whatever you're using) chainlink looking thing on the tensioner. As I look at the tensioner in the YT video, it appears the tensioner ram has teeth on it and operates like a ratchet. The chainlink looking thing appears to be connected to some sort of latching mechanism. Inserting the pin into the chainlink looking thing engages the latch with the ram teeth, preventing the ram from extending.
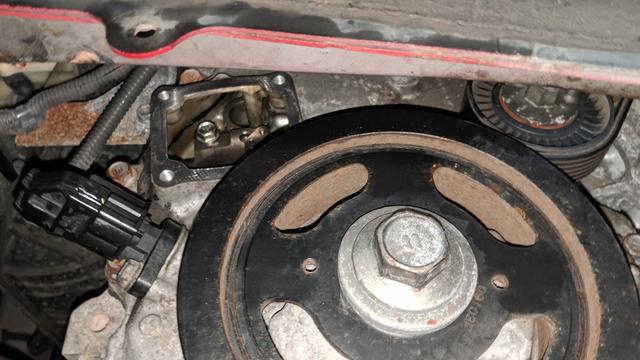
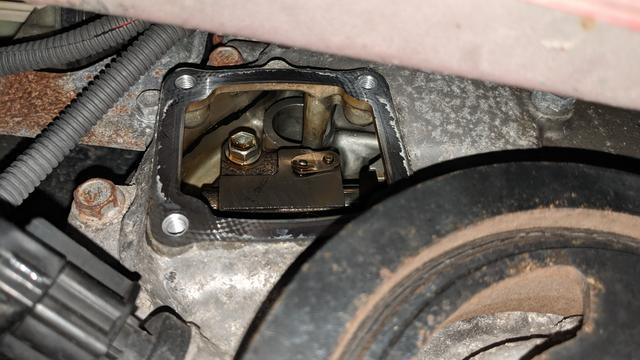
3) Now that the tensioner ram is at least partially retracted and latched, the crank can be turned clockwise (cw) to release the tension on the chain. This relaxes the pressure on the chain guide and the tensioner ram. In theory, the tensioner is now loose, being fixed only with the bolts. Because I haven't completed the job yet, I don't know if there is a pin extending out from the motor block into a hole on the back of the tensioner. If so, this pin could be the main reason why the tensioner has to be forcibly removed.
4)After removal of the bolts, the tensioner should be much easier to remove. As I mentioned before, I haven't completed the process yet so I'm not sure what is going to happen. Because I don't trust any of this, and am doing everything I can to avoid removing the timing chain cover, I'm going to be very cautious. After removing the top bolt, I'm sticking another longer wire into that open hole. I'm pushing it in all the way to the end of the threaded hole of that open bolt hole. I'll remove the second lower bolt. Continuing to hold onto the bolt hole wire, I'll try to remove the tensioner. I don't trust myself and am worried I'll drop the tensioner, which is why I'm using the long wire into the bolt hole.
If the above process works, it should improve the process of installing the tensioner too. Just start with the crank turned a bit cw so the chain is slack on the tensioner chain guide. After installing the tensioner, turn the crank ccw to push the tensioner chain guide up against the tensioner ram. Remove the pin from the chainlink looking thing and the ram will fully extend against the chain guide.
I invite anyone who has completed this job to verify the process I've proposed. I'm interested in knowing if this is going to result is my completing the iVVT job tonight or my family having to listen to cusswords that haven't even been invented yet.
***EDIT 7/29/24
The job is done and I have to say, I would have done the world a huge favor by buying a RAV4 years ago. I could impart wisdom regarding everything a person should NOT do when changing the iVVT gear. I'm going to leave in my original post for entertainment. You'll see how delusional I was in my confidence.
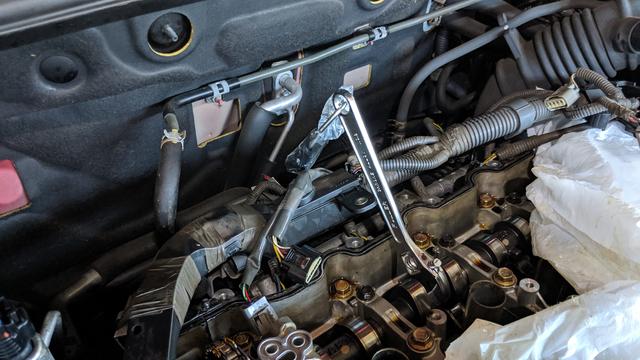
The tensioner, while still in the engine (2AR-FE) could not be retracted enough by tightening the timing chain. You'll recall I saw a video which made it appear this was a simple process if one only knew about it. The tensioner ram went back a bit but not enough to really remove strain on it when the chain was relaxed. I came to the idiotic conclusion it was retracted as much as possible and continued trying to get it out, which it refused to do. I had removed the bolts and it still wouldn't come out. I even put the bolts back in while I probably way overtightened the chain, trying to force it to retract. On the next attempt, after removing the bolts again, it still wouldn't come out. Prying it didn't seem to help either. Keep in mind, I did loosen the chain and the chainlink pin was in place, locking the ram as far back as could be managed. At some point, for inexplicable reasons, the tensioner shot to the left, away from the chain. I have no idea why it decided that would be a good time to do so. The only thing that saved me from having to remove the tensioner and/or the back gasket from the bottom of the timing chain compartment, was the wire coathanger I had inserted through one of the bolt holes. The tensioner was very difficult to remove from the hole due to the ram being extended so far. Once out, I played with it, trying to get it to retract, nothing I did would allow it to retract beyond the distance allowed by the ratcheting gear. I figured that was the best I could do.
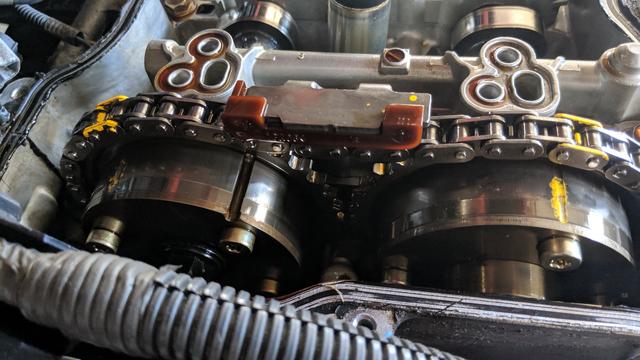
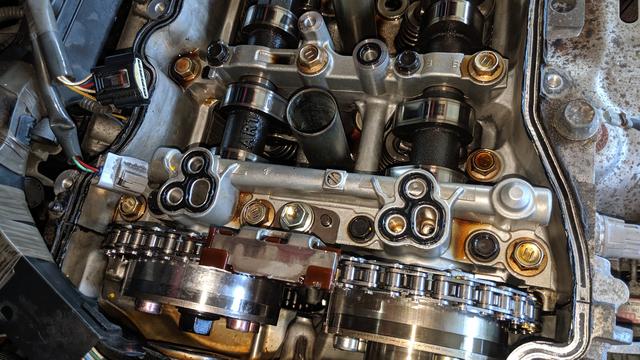
I managed to make two mistakes in one attempt with the iVVT gear. After what I thought was a smooth install, I turned the camshaft to lock it. Unfortunately, I did not keep firm control of the camshaft and chain, which allowed the camshaft to jump back. This caused the chain to skip a tooth on the exhaust gear (xVVT). I didn't think I could get it back in place without having to remove the iVVT gear again. It's only after removal you think about the fact the iVVT was already locked. I know the TSB outlines the process of unlocking but I have one of those dinky little air pumps which I had no confidence would supply enough pressure to unlock the gear. As a result, I did a bunch of research online and found a guy who had the most simple process for unlocking the gear outside the engine. I took it to work, where we have really great air pressure lines and was able to unlock it in no time. Just so you know, this process is ridiculously simple so I'll tell you how it works. Looking at the back of the iVVT, you'll see three circular holes and two rounded channels. One of the holes is larger than the others and mates to the pin on the end of the camshaft. BTW, when installing the iVVT into the engine, make sure the pin on the end of the camshaft actually goes through that hole before testing out your new torquewrench (ask me how I know this). Orient the gear in front of you with that larger hole at 12 o'clock. Press the rubber nosed attachment of your air hose gun into the smaller hole located next to the large hole. Iirc, that hole is located at approximately the 11 o'clock position. Give it a short burst of air. You'll hear the pin make a loud clicking sound as it shifts within the gear. If you then look at the right half of the gear, you'll see a channel that bends inwardly from approximately 5 o'clock to 2 o'clock. Move the rubber tip to the 2 o'clock position, where the channel goes into the main outer body of the gear. It's not a great fit because it isn't a round hole so you have to push it in pretty hard. Give it another burst of air. You should feel the gear rotate in your hand. If you turn it over, you'll see it now visibly unlocked with the two dots no longer next to each other. If you want to practice, you can always lock the gear by rotating it and repeat the process. It gives you a good idea of just how little force is required to lock it.
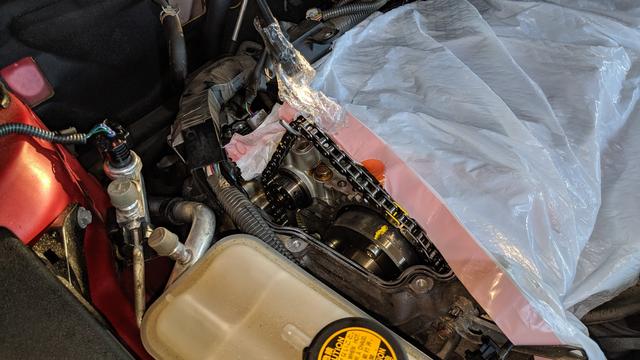
Getting back to our nightmare, I reset the chain into the correct location of the xVVT. The iVVT was reinstalled and I pressed down on the chain forcefully between the two VVT gears while I turned the camshaft to lock the iVVT. This time I was very careful to fully control everything and nothing unexpected happened. Still, I couldn't shake the feeling the crankshaft may have jumped a tooth at the same time as the xVVT. I'll continue on while that nags away in the back of my mind, probably taking years off my life. Because I had put paint on both the VVT gears and the chain, I knew the camshafts were correct. What I couldn't be sure of was if the crankshaft was correct. If it had skipped a tooth on the crankshaft, I could line it up to TDC but the only thing that wouldn't appear right would be the angle on the camshafts. One tooth off doesn't give you a lot of difference in angle so the nagging continued.
I spent a day and a half (intermittently) working on the tensioner. With it retracted as much as I could manage, it was a nightmare getting it into the hole. Nothing I did would allow me to get it oriented correctly to insert the bolts because the ram extended out too far, hitting the chain guide. All this time, I'm dealing with the newer version of the rear metal gasket, which is absolute garbage compared to the original. It's thin and flimly, easily bent at the clips holding it onto the tensioner. If you're doing this job, you may want to skip replacing that rear gasket as it really can't wear out.
As I've mentioned, I'm scared to death I'm going to drop something into the engine. So the entire time, I'm doing my work trying to hold a wire coathanger through a bolt hole. This sounds ridiculous now but it saved my butt more than once. Finally, I was near the point of surrender. There was no way this tensioner could be reinstalled. I took a deep breath and tried to distract my brain from all the nagging going on long enough to solve the problem. Whaaaaa??? I should've played with the tensioner more. While I can't tell you exactly what I did, as the OP described, if you push the chainlink looking thing up just right, the ram will press almost all the way back into the tensioner body (which squirts oil all over your shirt but amidst all this success that's now absolutely irrelevent). Ok, I'm officially an idiot. But I'm an idiot who has lived to fight another day. Now I can proceed to drop bolts, tensioners, gaskets and probably my wallet as well into the engine. Fortunately, none of those things happened. With the ram happily retracted, I realized just how small the tensioner actually was as I moved to reinstall it. Still not trusting myself though, I continued using the coathanger but this time, I put the wire in the bolt hole first, then slipped the tensioner over the wire before sliding it into the hole. Awesome, now all I have to do is put a bolt in the opposite corner and I'm suddenly into double digit IQ territory. The chain guide kept getting in the way though, causing some frustration. I took another piece of coathanger wire, bending it in such a way I could insert it into the hole at the bottom right corner. It did a great job of keeping the chain guide pushed to the right, allowing me to focus on the job of inserting bolts. With all the bends I wouldn't be able to describe how to duplicate it though. Getting the bolts in is not for the fainthearted but the only thing you can do to prevent them from dropping into the engine is to stuff paper towels below the tensioner. Of course I knew that but of course, being an idiot, I ignored those words of wisdom because of course that's why we're idiots. Still, I managed to get them in. I should mention that I was also worried about dropping the wire you're supposed to use in the chainlink looking thing. I'd already done so twice before but fortunately, it fell outside the engine. To prevent this from being an issue, I used a nylon standoff, which I found in my box of pc parts. It's about 3/8" long, with threaded male on one end, the other female threaded hole. I had a small wire terminal lug I could screw into one end, which I put a piece of string into, long enough I could pull it up should it fall into the engine. I shaved some of the threads down from the male end, which made for a satisfyingly tight fit into the chainlink looking part. One less thing to worry about is what Forrest would say. When the tensioner was finally installed, I just unscrewed the nylon standoff and the ram did exactly what it's been trained to do.
Someone posted a question elsewhere about the marks on the timing chain, asking if they were supposed to line up with every revolution of the crankshaft. I'd gone through this same issue with a previous job I'd done replacing the timing belt of a Tundra. They do not line up with every revolution. The marks on the chain/belt, camshaft and crankshaft are intended to be used for installation of the timing chain/belt. After the installation, assuming everything is lined up correctly, they will not line up on every revolution. On the Tundra, it took several hundred revolutions before those marks line up again (ask me how I know this). On the 2AR-FE, those marks will line up after fewer revolutions. Unfortunately, I didn't count how many revolutions but they do eventually line up again, somewhere between 30 and 60 revolutions. This is how I regained my confidence the timing chain had not skipped a tooth on the crankshaft. I just kept turning the crankshaft (after going to Home Depot to buy a ratcheting end wrench, which my wife complained about bitterly, asking "why are you always buying new tools"? All I could tell her is that HD doesn't' sell used tools. Ha-Ha, I'm still sleeping on the couch.) until the marks lined up on the camshaft and the crankshaft lined up as TDC.
Awesome, now what can I screw up now. Well...I'm not gonna tell you about that because it's really embarrassing having to explain why you need to replace your valve cover...eventually...it'll be ok for now...I hope.
TLDR:
You can't retract the tensioner much by tightening the timing chain. The video I saw was either for a different motor or the guy was just plain lucky.
I never was able to figure out how to remove enough tension from the chain so the timing chain guide wasn't pressing on the tensioner ram.
Play with the tensioner after you get it out. As the OP pointed out, it's not obvious how you get the ram to retract. If you play with it enough though, it will eventually retract to within 1/4" of the tensioner body. Don't even attempt to reinstall the tensioner without getting it to retract this much.
Consider using a nylon pin with a string on it to hold the chainlink looking thing that latches the ram. The pin needs to be tight so it doesn't fall out and the string will prevent it from being lost in the engine.
Using a piece of wire coathanger to hold the timing chain guide out of the way helped later when I needed to focus on inserting the bolts.
Consider using another piece of wire coathanger, inserting it into one of the bolt holes. This helped to slide the tensioner directly into position without worrying something would fall. It also helps if you get tired of holding the tensioner and it threatens to slip from your fingers.