I changed the rear oxygen sensor.
Why? I got check engine lights 5 times for 3 months.
The 2 OBD codes were
- P0138 (O2 Sensor Circuit High voltage Bank1 Sensor2)
- P0606 (ECU/PCM Fault)
First I changed the 4.5 years old battery hoping the ECU became crazy because of
low battery voltage when cranking.
3 weeks later, the same 2 codes were returned.
So now O2 sensor changing is my next try.
Model: Toyota 2006 Rav4 Base, odo 50,000 km
Engine: I4 2.4L 2AZ-FE
Sensor: Heated Oxygen sensor (After catalyst or Rear) Bank 1 Sensor 2
- OEM Toyota : TOYOTA 89465-42170
- Replace: Denso 234-4209 (Universal type, Splicing needed) Amazon.com $45 (Shipping $15 to Canada)
or 234-4622 (OE fit plug included, just plug in, no splicing) $60~$80 + shipping
0. Preparation & Observation
1. Take out old sensor
2. Prepare new sensor
3. Install New sensor
Today I received rear O2 sensor package.
Good packing and brand new Denso part.
includes
splicing metal crimps,
heat shrink tubes
& anti-seize compound.
![Image]()
Rav4 I4 2.4 has 2 Oxygen sensors, Bank1 Sensor1 and Sensor2.
I am changing only Sensor2.
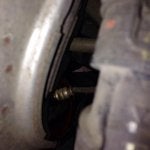
Find the same type plug under hood and practice unplugging with a flat screw driver.
![Image]()
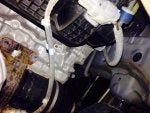
Sensor1 is located at just left side of the Battery.(I don't change Sensor 1)
Again, Find the same type plug under hood and practice unpluging with a flat screw driver.
![Image]()
ADDED PIC: I added this picture to show the same type plug.
![Image]()
Before go under body,
Let's try to find the Sensor2 from engine hood's left top view.
You can see just cable of the sensor.
![Image]()
Look at deeper inside
Now we see the sensor, cable and plug.
![Image]()
Time to crawl under...
I used 2 ramps & rear wheel chocks.
Also I added 2 extra stands under stand points,
you never know what will happen to the ramps.
I don't want to be found under the Rav4.
![Image]()
Sensor2 is located at about 20 cm backward of the engine oil pan plug under body.
![Image]()
Where the cable is going?
![Image]()
Oh there is the sensor plug.
I had to use 2 hands,
left hand for pulling out the cable, right hand to put a flat screw driver into the side of the plug.
After 30 seconds screw driver try, it's disconnected.
PRACTICE WITH THE SAME PLUG ON THE ENGINE (see 2nd & 3rd picture)
![Image]()
Now I splayed PB blaster around the sensor. and wait 10 minutes.
![Image]()
22 mm (7/8 inch) wrench... Open-end of the wrench must fit the sensor.
With this small Rav4 plug,
I could put the box-end wrench thru the plug, better than open-end.
![Image]()
Turn counter-clock wise.
I used only about 30% of my one hand mustle. PB Blaster made it easier? Probably.
![Image]()
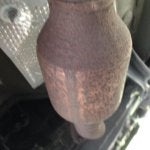
Got it out. this old sensor part number "TOYOTA 89465-42170"
![Image]()
I will cut the OEM old sensor cable to re-use the plug.
![Image]()
Old OEM sensor has different cable colors from new Denso sensor;
DENSO -------- OEM MEANING
=============================================
BLUE ------- BLACK Signal +
WHITE ------- GRAY Signal -
BLACK ------- WHITE Heater
BLACK ------- WHITE Heater
I used a soldering iron to connect it,
but I realized the cable's metal wire was not really friendly to the solder lead,
lead does not well stick to the wire.
![Image]()
So instead of the lead soldering,
next time I will just use the included metal splicing crimps.
![Image]()
Anyway I managed to use soldering.
Heat shrink tubes on the connection, my heat gun make them tight.
(If you don't have a heat gun, just use a cigarette lighter)
Also I used electric black tape on top of them.
![Image]()
Before put the new sensor into the bung,
I put the included anti-seize compound on the bolt thread.
![Image]()
My hand put the sensor in.
then I used the box-end wrench with the little finger of my right hand.
Then, put the electric plug in. Job Done!
![Image]()
Used part;
Denso 234-4209 Universal type, Heated oxygen sensor
I bought thru Amazon.com seller $45 (Ship $15 to Canada) Total US$60 paid.
Denso 234-4209 Universal
![Image]()
Denso 234-4622 OEM fit
![Image]()
Used tools;
- Ramps, stands, chocks
- PB blaster ( $8 )
- Flat screw driver
- 22mm (or 7/8 inch) wrench
- Cutters or pliers
- Heat gun or cigarette lighter
- Electric tape
- Soldering iron & lead (optional, Just use the included splicing metal crimps)
- Anti-seize compound (included)
![Image]()
Time to do;
- About 1 hour to be careful, If I do again, now I can do within 20~30 minutes.
Disclaimer:
This is just for EDUCATIONAL ONLY information.
I do NOT recommend or ask you to do the same.
I am not responsible for anything you do ever, regarding your vehicle or anything else. Anything you choose to do, you do of your own free will. I cannot be held accountable for anything you try. I am not a mechanic or a technician. I have no official knowledge of anything regarding Rav4, but am simply relating my own experiences. DO EVERYTHING AT YOUR OWN RISK. ANYTHING YOU DO MAY VOID YOUR WARRANTY OR RUIN YOUR TRUCK. Death or injury, serious or otherwise may occur if you try anything on this page. YOU HAVE BEEN WARNED.
Edited for P0168 (typo)--> P0138 (right code)
Why? I got check engine lights 5 times for 3 months.
The 2 OBD codes were
- P0138 (O2 Sensor Circuit High voltage Bank1 Sensor2)
- P0606 (ECU/PCM Fault)
First I changed the 4.5 years old battery hoping the ECU became crazy because of
low battery voltage when cranking.
3 weeks later, the same 2 codes were returned.
So now O2 sensor changing is my next try.
Model: Toyota 2006 Rav4 Base, odo 50,000 km
Engine: I4 2.4L 2AZ-FE
Sensor: Heated Oxygen sensor (After catalyst or Rear) Bank 1 Sensor 2
- OEM Toyota : TOYOTA 89465-42170
- Replace: Denso 234-4209 (Universal type, Splicing needed) Amazon.com $45 (Shipping $15 to Canada)
or 234-4622 (OE fit plug included, just plug in, no splicing) $60~$80 + shipping
0. Preparation & Observation
1. Take out old sensor
2. Prepare new sensor
3. Install New sensor
Today I received rear O2 sensor package.
Good packing and brand new Denso part.
includes
splicing metal crimps,
heat shrink tubes
& anti-seize compound.

Rav4 I4 2.4 has 2 Oxygen sensors, Bank1 Sensor1 and Sensor2.
I am changing only Sensor2.
Find the same type plug under hood and practice unplugging with a flat screw driver.

Sensor1 is located at just left side of the Battery.(I don't change Sensor 1)
Again, Find the same type plug under hood and practice unpluging with a flat screw driver.

ADDED PIC: I added this picture to show the same type plug.

Before go under body,
Let's try to find the Sensor2 from engine hood's left top view.
You can see just cable of the sensor.

Look at deeper inside
Now we see the sensor, cable and plug.

Time to crawl under...
I used 2 ramps & rear wheel chocks.
Also I added 2 extra stands under stand points,
you never know what will happen to the ramps.
I don't want to be found under the Rav4.

Sensor2 is located at about 20 cm backward of the engine oil pan plug under body.

Where the cable is going?

Oh there is the sensor plug.
I had to use 2 hands,
left hand for pulling out the cable, right hand to put a flat screw driver into the side of the plug.
After 30 seconds screw driver try, it's disconnected.
PRACTICE WITH THE SAME PLUG ON THE ENGINE (see 2nd & 3rd picture)

Now I splayed PB blaster around the sensor. and wait 10 minutes.

22 mm (7/8 inch) wrench... Open-end of the wrench must fit the sensor.
With this small Rav4 plug,
I could put the box-end wrench thru the plug, better than open-end.

Turn counter-clock wise.
I used only about 30% of my one hand mustle. PB Blaster made it easier? Probably.

Got it out. this old sensor part number "TOYOTA 89465-42170"

I will cut the OEM old sensor cable to re-use the plug.

Old OEM sensor has different cable colors from new Denso sensor;
DENSO -------- OEM MEANING
=============================================
BLUE ------- BLACK Signal +
WHITE ------- GRAY Signal -
BLACK ------- WHITE Heater
BLACK ------- WHITE Heater
I used a soldering iron to connect it,
but I realized the cable's metal wire was not really friendly to the solder lead,
lead does not well stick to the wire.

So instead of the lead soldering,
next time I will just use the included metal splicing crimps.

Anyway I managed to use soldering.
Heat shrink tubes on the connection, my heat gun make them tight.
(If you don't have a heat gun, just use a cigarette lighter)
Also I used electric black tape on top of them.

Before put the new sensor into the bung,
I put the included anti-seize compound on the bolt thread.

My hand put the sensor in.
then I used the box-end wrench with the little finger of my right hand.
Then, put the electric plug in. Job Done!

Used part;
Denso 234-4209 Universal type, Heated oxygen sensor
I bought thru Amazon.com seller $45 (Ship $15 to Canada) Total US$60 paid.
Denso 234-4209 Universal
Denso 234-4622 OEM fit
Used tools;
- Ramps, stands, chocks
- PB blaster ( $8 )
- Flat screw driver
- 22mm (or 7/8 inch) wrench
- Cutters or pliers
- Heat gun or cigarette lighter
- Electric tape
- Soldering iron & lead (optional, Just use the included splicing metal crimps)
- Anti-seize compound (included)

Time to do;
- About 1 hour to be careful, If I do again, now I can do within 20~30 minutes.
Disclaimer:
This is just for EDUCATIONAL ONLY information.
I do NOT recommend or ask you to do the same.
I am not responsible for anything you do ever, regarding your vehicle or anything else. Anything you choose to do, you do of your own free will. I cannot be held accountable for anything you try. I am not a mechanic or a technician. I have no official knowledge of anything regarding Rav4, but am simply relating my own experiences. DO EVERYTHING AT YOUR OWN RISK. ANYTHING YOU DO MAY VOID YOUR WARRANTY OR RUIN YOUR TRUCK. Death or injury, serious or otherwise may occur if you try anything on this page. YOU HAVE BEEN WARNED.
Edited for P0168 (typo)--> P0138 (right code)