

I forgot that I did this DIY some time ago, and forgot to post it. This is another easy DIY that I learned from toyotanation and thought I'd put here for Rav4-specific purposes. I flushed the factory power steering fluid on two Ravs, and replaced both with Mobil 1 Synthetic ATF. The Rav4 uses ATF Dexron II/III fluid in the power steering system, not "power steering fluid"; ATF = automatic transmission fluid, but in this case, its power steering fluid, too.
Considering that this only costs about $10-15 in supplies and takes under an hour, its a great DIY; such service costs about $120 at a shop. Its actually rather fun, too. New cars now have electric power steering, so this will be a thing of the past...")
SUPPLIES:
- 4 or 5 feet of 3/8" inner-diameter (ID) clear tubing (available at Lowe's, Home Depot, etc), cut to about a 1' length and a longer length (3-4')
- one 3/8" ID barbed connector
- 1 quart (0.946 L) of ATF Dexron II/III
- baster
- pliers
- empty container of at least 1 liter capacity
- small container, like a yogurt container
- old clothes, towels

STEPS:
0.) It is not absolutely necessary to lift the front wheels off the ground for this procedure, but it certainly helps. The reason it helps is because part of this process requires the wheels to be turned from lock to lock with the engine off (and therefore the power steering pump off). If you cannot lift the wheels, then get two squares of the slickest linoleum tiles that you can find while you're at Lowe's buying the barb connector and the tubing; put them on the ground at Lowe's, upside down, and step on them and twist to test this (don't ruin them, obviously, because that's not right, unless you're going to buy them). You can drive your front wheels onto these linoleum tiles, and they will reduce the effort required to turn the wheels.
1.) Clean the power steering reservoir. I used blue tape to mark the level midway between the COLD MIN and COLD MAX lines, so that it was easier to see. Remove the cap; inspect the rubber gasket, and clean it. Put old clothes or towels all around the area to catch any fluid. There are two drive belts very near the area you’ll be working in, and you don’t want to get ATF on these belts, because then you’ll have slipping belts! Go to town with the clothes/towels and just cover everything you can. ATF stinks very bad, so you won't be able to reuse anything or wash it---it'll have to go straight to the trash.

2.) Using the baster, remove as much fluid from the reservoir as you can. Try to get a very small diameter baster like the one shown, because there is a baffle in the reservoir which will prevent a regular baster from reaching in very far.

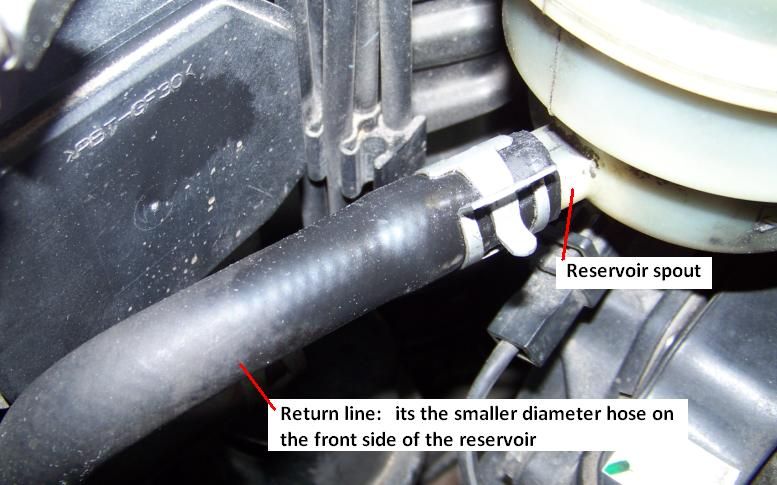
3.) Locate the return line: it is the smaller diameter hose connected to the reservoir. For the Rav, it is on the front side of the reservoir.
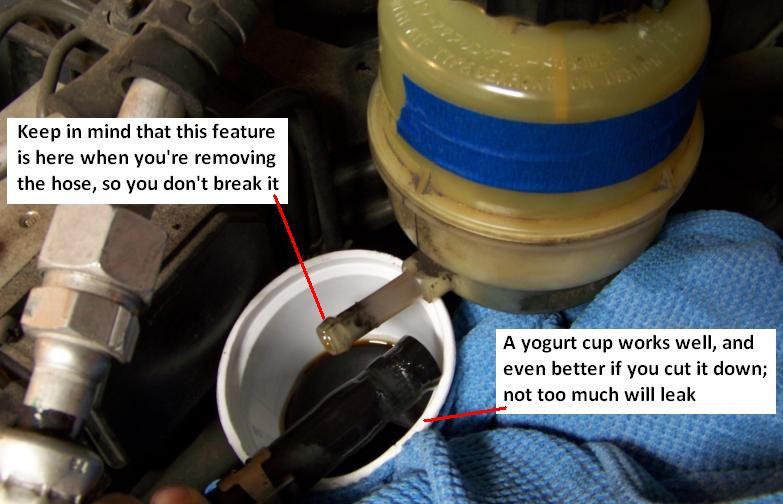
4.) Next, you'll disconnect the return line: Unclamp the return line clamp using pliers, and slide it down the hose about 4 inches. Place a small container under the spout, or have it nearby enough that you can easily reach it. By hand, disconnect the return hose from the reservoir; look ahead at the next picture to see that the hose is over an approximately 2.5” spout with a bulb-feature on the end. It takes a little bit of effort to get this hose free: its just a matter of rotating it a little and pulling back. It took me fifteen minutes to get it free on one Rav4, but it did come free. Don’t use anything (like channel locks or vice grips) that will damage either the hose itself or the plastic spout. It CAN be done by hand, but it might take a while; its better than damaging the line. Before you remove the line completely, place the container under it and the spout, as some fluid will leak from both the line and the reservoir.
5.) Inspect the return line; one Rav I did had a slight break at the end of the hose which was causing a very, very, very slow (drip slow) leak. If you look directly below where the return line connects and you see an oily spot, then this is a sign that the hose is dripping. Luckily, there is enough slack to simply cut the hose down to remove the damaged part. I removed about 1/3” of hose using a razor blade, and there was still plenty of reach.
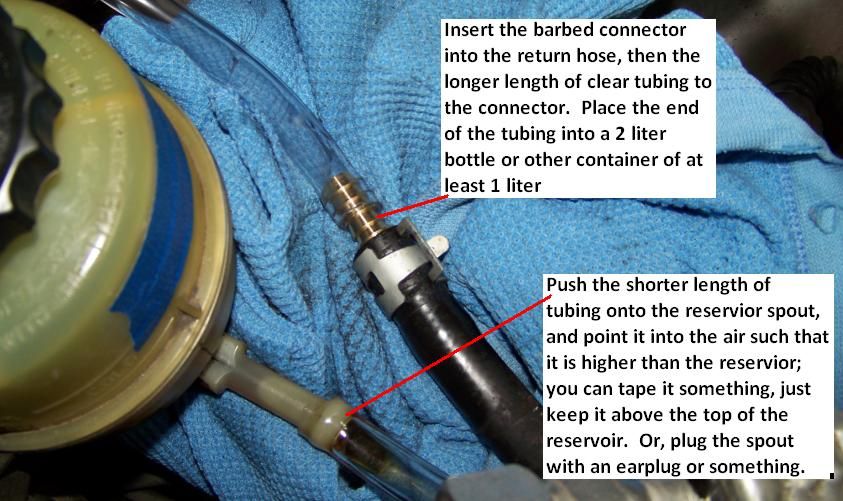
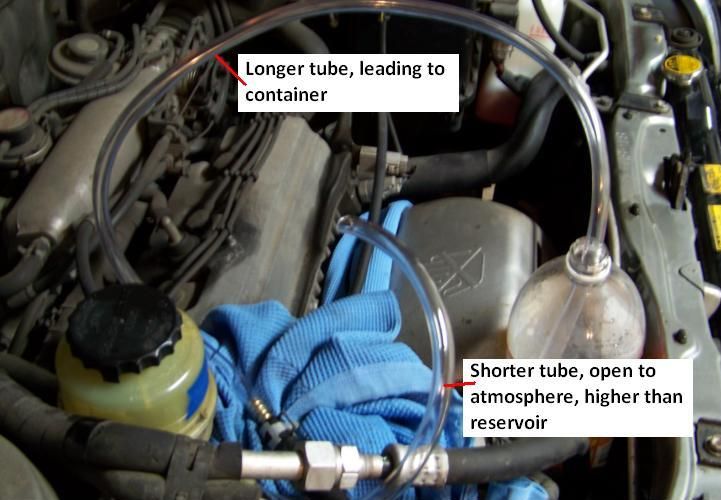
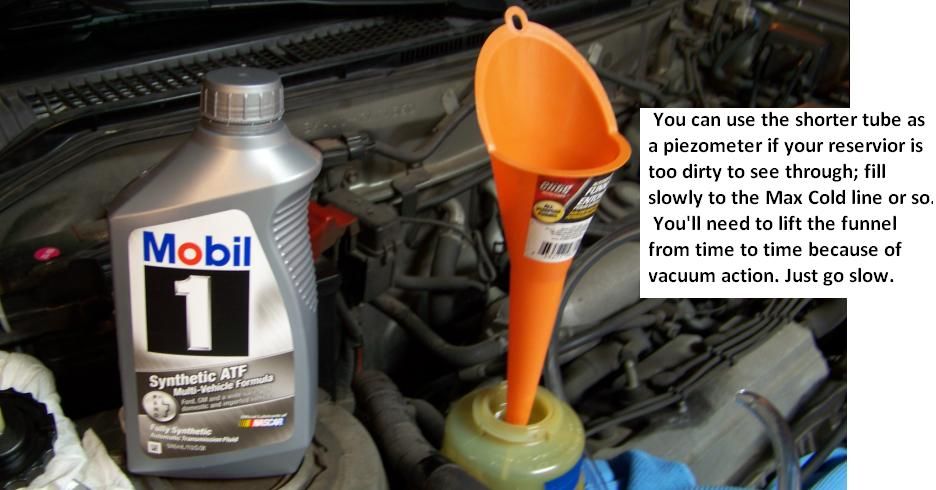
6.) Next, you'll connect the tubing: Partially insert the barbed connector into the return line hose, and then remove it; this helps prevent it from becoming stuck later when you need to remove it. Do this once or twice, then fully insert one end of the barbed connector into the return line, and the other end into your longer length of tubing. Run the long tubing into a 1 liter + container, and wedge the container somewhere where it will not fall, or place it over the fender to the ground if you have enough length of tubing. For the spout on the reservoir, you can either plug it with something (like an earplug), or place your shorter length of tubing on it, and leave it open to atmosphere, and use it like a piezometer. Its nice to do this because its easier to see the level from the driver’s seat, but its not necessary. If you do this, just be sure that the tubing is pointing up, and reaches above the top of the reservoir, and either wedge it in that position, or tape it to something that will keep it vertical. The down side of this method is that if you’re not careful you’ll spill all over, but that won't happen if you just pour slowly.
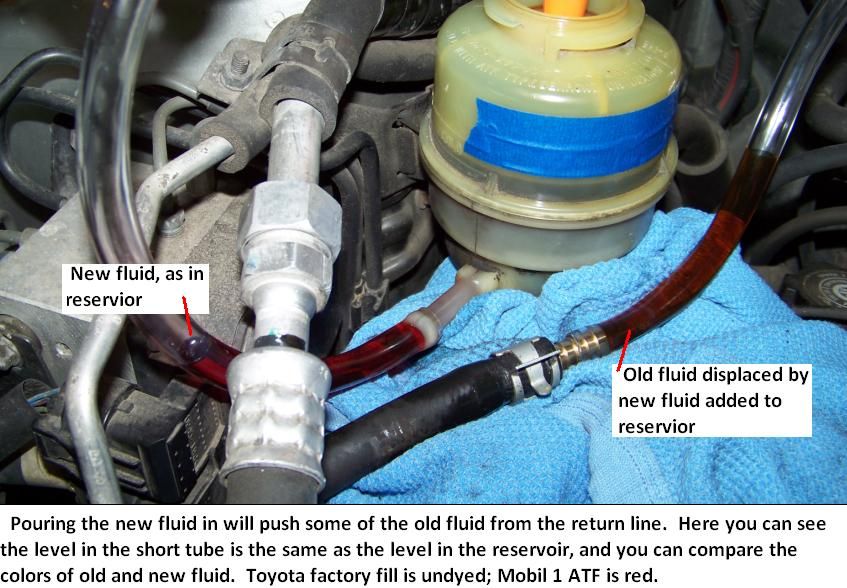
7.) Pour new fluid into the reservoir; lift the funnel occasionally to prevent any vacuum action. You’ll see that the new fluid displaces some of the old fluid, and pushes it into the clear tubing connected to the return line. Compare the colors.
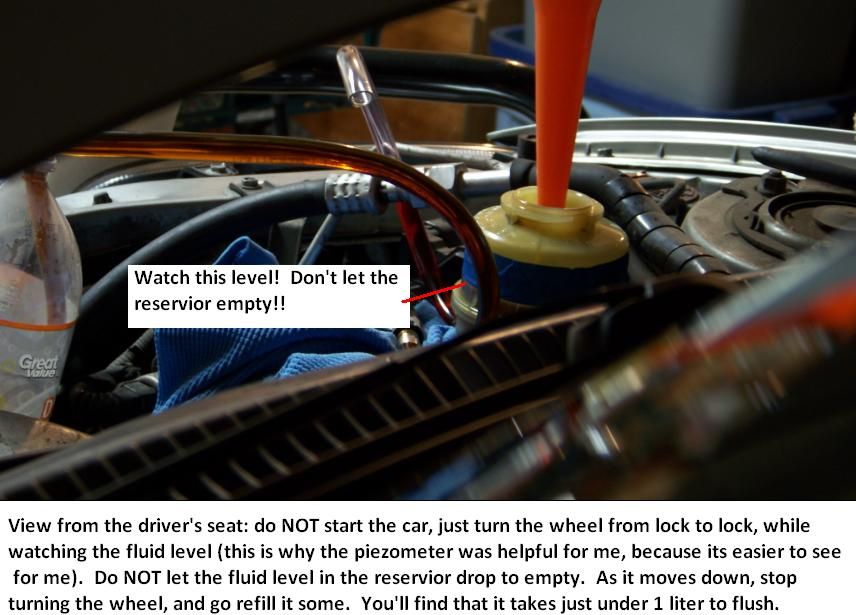
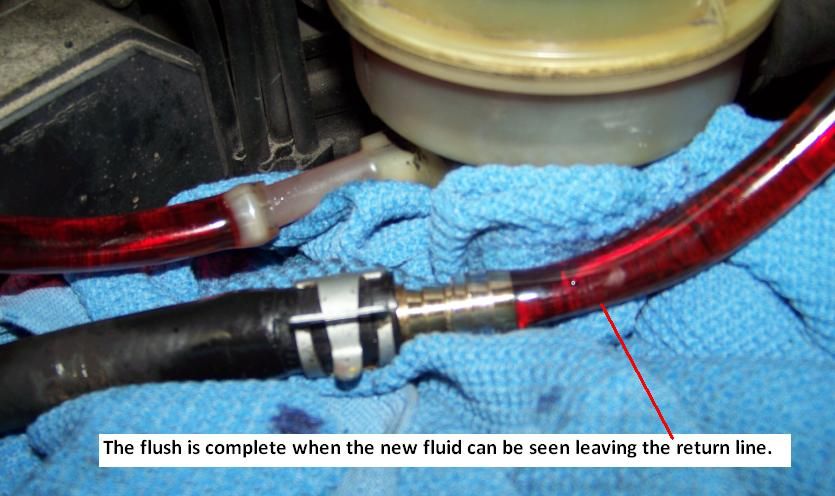
8.) Go over to the steering wheel; do NOT turn on the engine. Turn the key to the ACC position, but again do not turn on the engine. Slowly turn the wheel from lock to lock (that is, all the way until you can’t turn it anymore), while watching the level in the reservoir/piezometer. DO NOT LET THE RESERVOIR RUN EMPTY. If you have someone to help you, have them turn the wheel while you watch the fluid level and refill it as needed. Remember to lift the funnel occassionally, and pour slowly. You will see the level in the reservoir drop as you turn the wheel, and fluid is pushed through the system. Continue turning the wheel and refilling the reservoir until you see the new fluid in the return line tubing. It will take close to 1 liter (less than 1 quart); stop right when you see this, to be sure that you’ll have enough fluid to refill the reservoir with what’s left in your 1 quart bottle, and you can save money by doing it all with just 1 quart.
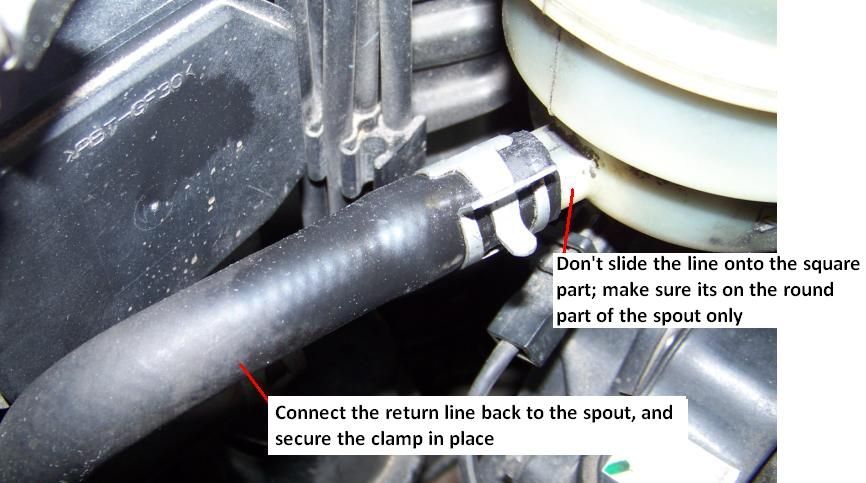
9.) Next, you'll disconnect the tubing and reconnect the return line back to the reservoir. Once you have displaced all the old fluid, lift the tubing on the return line to help drain as much into the container as possible, so you have less to leak when you disconnect this part. Disconnect the barbed connect from the return line; if you hold it up vertically, not much will leak. Next, disconnect the tubing from the reservoir spout (or remove the earplug, whatever), and quickly place your finger over the spout opening to prevent leaking from the reservoir. With the other hand, connect the return hose back to the spout. Slide the return hose all the way back to the end of the cylindrical part of the spout, but NOT onto the square part. Replace the clamp.
10.) Now you'll bleed the system of air. Refill the reservoir to between the COLD MIN and COLD MAX lines. Leave the lid off the reservoir, and return to the steering wheel again. Bleed the system of air by again just turning the wheel from lock to lock. Watch the level in the reservoir; it will dip as you turn the wheel, but it shouldn't drop considerably. Turn from lock to lock several times, until the level stabilizes, as that means no more air is trapped. Center the wheel. Top off the reservoir again to between the COLD MIN and COLD MAX lines. Replace the lid.

11.) Feel under the return line for leaks. Clean the area well so you’ll later be able to tell if there are leaks. (I had no problems at all with leaks on either Rav). Clean the bay of tools, towels, fluids, caps, etc, and you’re done! Check the fluid level after a day.
Considering that this only costs about $10-15 in supplies and takes under an hour, its a great DIY; such service costs about $120 at a shop. Its actually rather fun, too. New cars now have electric power steering, so this will be a thing of the past...
SUPPLIES:
- 4 or 5 feet of 3/8" inner-diameter (ID) clear tubing (available at Lowe's, Home Depot, etc), cut to about a 1' length and a longer length (3-4')
- one 3/8" ID barbed connector
- 1 quart (0.946 L) of ATF Dexron II/III
- baster
- pliers
- empty container of at least 1 liter capacity
- small container, like a yogurt container
- old clothes, towels

STEPS:
0.) It is not absolutely necessary to lift the front wheels off the ground for this procedure, but it certainly helps. The reason it helps is because part of this process requires the wheels to be turned from lock to lock with the engine off (and therefore the power steering pump off). If you cannot lift the wheels, then get two squares of the slickest linoleum tiles that you can find while you're at Lowe's buying the barb connector and the tubing; put them on the ground at Lowe's, upside down, and step on them and twist to test this (don't ruin them, obviously, because that's not right, unless you're going to buy them). You can drive your front wheels onto these linoleum tiles, and they will reduce the effort required to turn the wheels.
1.) Clean the power steering reservoir. I used blue tape to mark the level midway between the COLD MIN and COLD MAX lines, so that it was easier to see. Remove the cap; inspect the rubber gasket, and clean it. Put old clothes or towels all around the area to catch any fluid. There are two drive belts very near the area you’ll be working in, and you don’t want to get ATF on these belts, because then you’ll have slipping belts! Go to town with the clothes/towels and just cover everything you can. ATF stinks very bad, so you won't be able to reuse anything or wash it---it'll have to go straight to the trash.

2.) Using the baster, remove as much fluid from the reservoir as you can. Try to get a very small diameter baster like the one shown, because there is a baffle in the reservoir which will prevent a regular baster from reaching in very far.

3.) Locate the return line: it is the smaller diameter hose connected to the reservoir. For the Rav, it is on the front side of the reservoir.

4.) Next, you'll disconnect the return line: Unclamp the return line clamp using pliers, and slide it down the hose about 4 inches. Place a small container under the spout, or have it nearby enough that you can easily reach it. By hand, disconnect the return hose from the reservoir; look ahead at the next picture to see that the hose is over an approximately 2.5” spout with a bulb-feature on the end. It takes a little bit of effort to get this hose free: its just a matter of rotating it a little and pulling back. It took me fifteen minutes to get it free on one Rav4, but it did come free. Don’t use anything (like channel locks or vice grips) that will damage either the hose itself or the plastic spout. It CAN be done by hand, but it might take a while; its better than damaging the line. Before you remove the line completely, place the container under it and the spout, as some fluid will leak from both the line and the reservoir.

5.) Inspect the return line; one Rav I did had a slight break at the end of the hose which was causing a very, very, very slow (drip slow) leak. If you look directly below where the return line connects and you see an oily spot, then this is a sign that the hose is dripping. Luckily, there is enough slack to simply cut the hose down to remove the damaged part. I removed about 1/3” of hose using a razor blade, and there was still plenty of reach.
6.) Next, you'll connect the tubing: Partially insert the barbed connector into the return line hose, and then remove it; this helps prevent it from becoming stuck later when you need to remove it. Do this once or twice, then fully insert one end of the barbed connector into the return line, and the other end into your longer length of tubing. Run the long tubing into a 1 liter + container, and wedge the container somewhere where it will not fall, or place it over the fender to the ground if you have enough length of tubing. For the spout on the reservoir, you can either plug it with something (like an earplug), or place your shorter length of tubing on it, and leave it open to atmosphere, and use it like a piezometer. Its nice to do this because its easier to see the level from the driver’s seat, but its not necessary. If you do this, just be sure that the tubing is pointing up, and reaches above the top of the reservoir, and either wedge it in that position, or tape it to something that will keep it vertical. The down side of this method is that if you’re not careful you’ll spill all over, but that won't happen if you just pour slowly.


7.) Pour new fluid into the reservoir; lift the funnel occasionally to prevent any vacuum action. You’ll see that the new fluid displaces some of the old fluid, and pushes it into the clear tubing connected to the return line. Compare the colors.


8.) Go over to the steering wheel; do NOT turn on the engine. Turn the key to the ACC position, but again do not turn on the engine. Slowly turn the wheel from lock to lock (that is, all the way until you can’t turn it anymore), while watching the level in the reservoir/piezometer. DO NOT LET THE RESERVOIR RUN EMPTY. If you have someone to help you, have them turn the wheel while you watch the fluid level and refill it as needed. Remember to lift the funnel occassionally, and pour slowly. You will see the level in the reservoir drop as you turn the wheel, and fluid is pushed through the system. Continue turning the wheel and refilling the reservoir until you see the new fluid in the return line tubing. It will take close to 1 liter (less than 1 quart); stop right when you see this, to be sure that you’ll have enough fluid to refill the reservoir with what’s left in your 1 quart bottle, and you can save money by doing it all with just 1 quart.


9.) Next, you'll disconnect the tubing and reconnect the return line back to the reservoir. Once you have displaced all the old fluid, lift the tubing on the return line to help drain as much into the container as possible, so you have less to leak when you disconnect this part. Disconnect the barbed connect from the return line; if you hold it up vertically, not much will leak. Next, disconnect the tubing from the reservoir spout (or remove the earplug, whatever), and quickly place your finger over the spout opening to prevent leaking from the reservoir. With the other hand, connect the return hose back to the spout. Slide the return hose all the way back to the end of the cylindrical part of the spout, but NOT onto the square part. Replace the clamp.

10.) Now you'll bleed the system of air. Refill the reservoir to between the COLD MIN and COLD MAX lines. Leave the lid off the reservoir, and return to the steering wheel again. Bleed the system of air by again just turning the wheel from lock to lock. Watch the level in the reservoir; it will dip as you turn the wheel, but it shouldn't drop considerably. Turn from lock to lock several times, until the level stabilizes, as that means no more air is trapped. Center the wheel. Top off the reservoir again to between the COLD MIN and COLD MAX lines. Replace the lid.

11.) Feel under the return line for leaks. Clean the area well so you’ll later be able to tell if there are leaks. (I had no problems at all with leaks on either Rav). Clean the bay of tools, towels, fluids, caps, etc, and you’re done! Check the fluid level after a day.


