Alright, so I ordered the seal and dust boot and put them in, so I thought I'd do a quick write up, though it's pretty straightforward. The whole thing is an assembly and has to be removed and dismantled for the seal to be replaced so it took longer than originally expected but it went smoothly. If I'd have studied it a bit more, I'd have ordered a new crush washer for the retaining bolt and gasket for the control shaft cover, but it seems to have done ok without them.
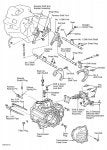
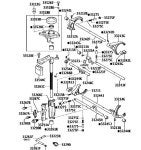
The Shift and Select Lever Shaft Assembly is what you'll be removing.
(
https://www.rav4world.com/forums/me...ums/members/albums/389153-eunos/parts-8759-picture51201-trans-exploded-view.png)
To do so, first put the transmission in neutral, remove the left front wheel, left splash guard, and airbox. Push the evap canister up from below and move it out of the way.
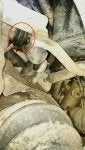
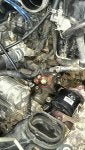
Remove the clip and washer from the shift cable shown to the right if the circled area (the dust boot) in this pic.
(
https://www.rav4world.com/forums/me...members/albums/389153-eunos/parts-8759-picture51203-img-20180707-162922-dro.jpg)
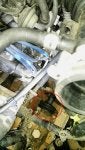
Loosen the left bolt in the pic below and remove the right, then swing the arm out of the way so the control shaft can come free. You can remove the left engine mount if you need more room.
(
https://www.rav4world.com/forums/me...members/albums/389153-eunos/parts-8759-picture51205-img-20180714-102423-dro.jpg)
Use a 24mm socket to remove the lock bolt on top of the transmission, then remove the four bolts holding the cover on. You'll need a long extension and u joint for the innermost lower bolt. After that, the assembly can be pulled free but if it doesn't want to come easily, use a hammer and long flathead screwdriver with the tip wrapped in electrical tape to tap it out. The cover is aluminum and nicks easily, so be gentle.
(
https://www.rav4world.com/forums/me...members/albums/389153-eunos/parts-8759-picture51207-img-20180714-104739-dro.jpg)
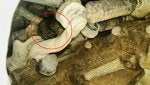
Once it's out clean it off, being careful of the gasket which is very thin and was stuck to the cover, and note how it's assembled.
(
https://www.rav4world.com/forums/me...members/albums/389153-eunos/parts-8759-picture51209-img-20180714-105312-dro.jpg)
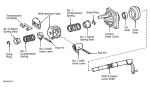
The exploded view helps a lot but it is a little unclear, so note that the number 2 shift inner lever is positioned so the protrusion is closest to the number 1 lever and the oil baffle's open end is facing the end of the shaft.
(
https://www.rav4world.com/forums/me.../members/albums/389153-eunos/parts-8759-picture51211-selector-exploded-view.png)
Use a pin punch to remove the long roll pin from the no.2 lever, taking care not to damage the baffle.
Next remove the outer snap ring - I used a small clamp to hold the spring back and pliers to pull the ring off. Slide the spring and seat off, then knock out the smaller pin from the no.1 lever and remove it and the interlock plates as one. Remove the spring, seat, and snap ring.
The cover will slide off the shaft now and you can remove the boot and seal, again being careful not the scratch the cover. Clean the bore, then use put a thin layer of lube on the seal and push it in to a depth of .02" or just barely below flush. The flat side should face out. Put some grease on the shaft and inner surface of the seal then reassemble, making sure to install the boot with the vent facing down.
Install the inner snap ring, spring/seat, then the no.1 lever. The lever only fits on one way, so don't worry about getting in upside down. Next, slide the no.2 lever on, making sure the protrusion is at the bottom and closer to the no.1 lever. Do not install the pin yet, but use the clamp to hold the spring back so you can put the snap ring back on. Now the pin can be installed. Insert the punch from one side to line everything up and drive the pin in from the other side. Be careful to guide the pin through the baffle as it exits or else the baffle can bend. Also make sure the baffle faces the correct way.
At this point, you can replace the gasket if you have a new one; I didn't, so instead opted to use a very thin layer of RTV to ensure a good seal. Slide the whole thing back into the transmission, loosely install all four bolts (I couldn't find any torque specs but used threadlocker on them) and snug them down. Put the lock bolt back on with a new crush washer and torque it to 39 ft-lbs. Reattach the shift cable and bolt the arm for the second cable back down, then test that it shifts as it should. If it's all right, secure the evap canister, reassemble and go for a drive.
I can't remember where I found the manuals for download, but if you have them, the relevant pages are 2-3, 15-16, and 29-30 in the Manual Trans Overhaul pdf. (link added:
https://drive.google.com/drive/fold...m/drive/folders/0B61gpLoGBEPNNlR6cDEzOU9rYUk?docId=0B61gpLoGBEPNazBwdGNFMFh4c3c)
When removing the first bolt for the cover, the trans vented quite a bit of pressure, so I checked and cleaned the breather. That was probably the cause so check yours while you're at it. Actually, check it even if you don't have a leak.


